Supabase vs Clerk - Choose the Right Auth for Your SaaS
This is the next post in a series of awesome developer tools I intend to write about. In earlier posts I talk about Strean, CodeRabbit, Cursor, Neon, Supabase, Postgres and MongoDB it's worth revisiting:
Today I want to talk about auth which is one of the most critical component of any app. Whether you're building a simple web app or a full-scale app, ensuring that users can securely log in and manage their accounts is essential.
And based on all the feedback—and a good amount of time spent in developer communities, Twitter and Reddit — I've picked out 2 popular options for authentication: Supabase and Clerk.
In this article, let's take a detailed look at Supabase Auth and Clerk Auth, I'll focus on their offerings, and how you can implement them with a
React frontendand.NET backend. By the end, you'll have a clear understanding of which solution may work best for you.
If you don't have time to read and want to jump straight to the code, check out the demo.
What is Clerk
Clerk is a developer-first authentication platform, designed for apps where user management and complex workflows are required. Clerk goes beyond simple user auth, offering features like user profile management, session management, and fine-grained permissions.
What is Supabase
Supabase is an open-source alternative to Firebase, offering various backend services, including authentication, real-time databases, and storage. Supabase's authentication system is built on PostgreSQL and integrates well with the rest of the Supabase ecosystem.
On Features
Supabase
Key Features of Supabase Auth:
-
Email/Password Authentication - Supabase provides traditional
email/passwordauth with verification links. -
OAuth Providers - Support for social login through
Google,Facebook,GitHub, and otherOAuthproviders. -
Magic Links - Passwordless auth using
email-basedmagic links. -
Secure Session Management - Supabase securely handles
sessionswith accesstokensand refresh tokens. -
Role-Based Access Control (RBAC) - Users can be assigned
roles, andpermissionscan be managed using policies in thePostgreSQLdatabase. -
Multi-Factor Authentication (MFA) - With third-party integrations,
MFAcan be enabled for added security.
Clerk
Key Features of Clerk:
-
Email/Password Authentication - Similar to Supabase, Clerk supports traditional
email/passwordauthentication. -
Social Login - Supports a wide variety of
OAuthproviders, includingGoogle,Facebook,Twitter,GitHub, and more. -
Magic Links and Passwordless Login - Clerk allows users to log in with
magic links, providing a smooth,passwordlessexperience. -
Session Management - Clerk offers built-in
sessionmanagement, with support for multiple active sessions and session revocation. -
User Profile Management - Clerk provides
APIsfor managing detailed userprofiles, includingavatars,email addresses, and phone numbers. -
Multi-Factor Authentication (MFA) - Clerk natively supports
MFAfor enhanced security. -
Customizable User Flows - Clerk gives developers full control over the
user onboardingexperience, from sign-ups to custom redirect flows. -
Clerk SDKs - Clerk has official SDKs for
React,Next.js, and other frontend frameworks, as well as backend integration forNode.js,.NET, and others.
Next, let's set them up in local and see a live demo.
On Setup
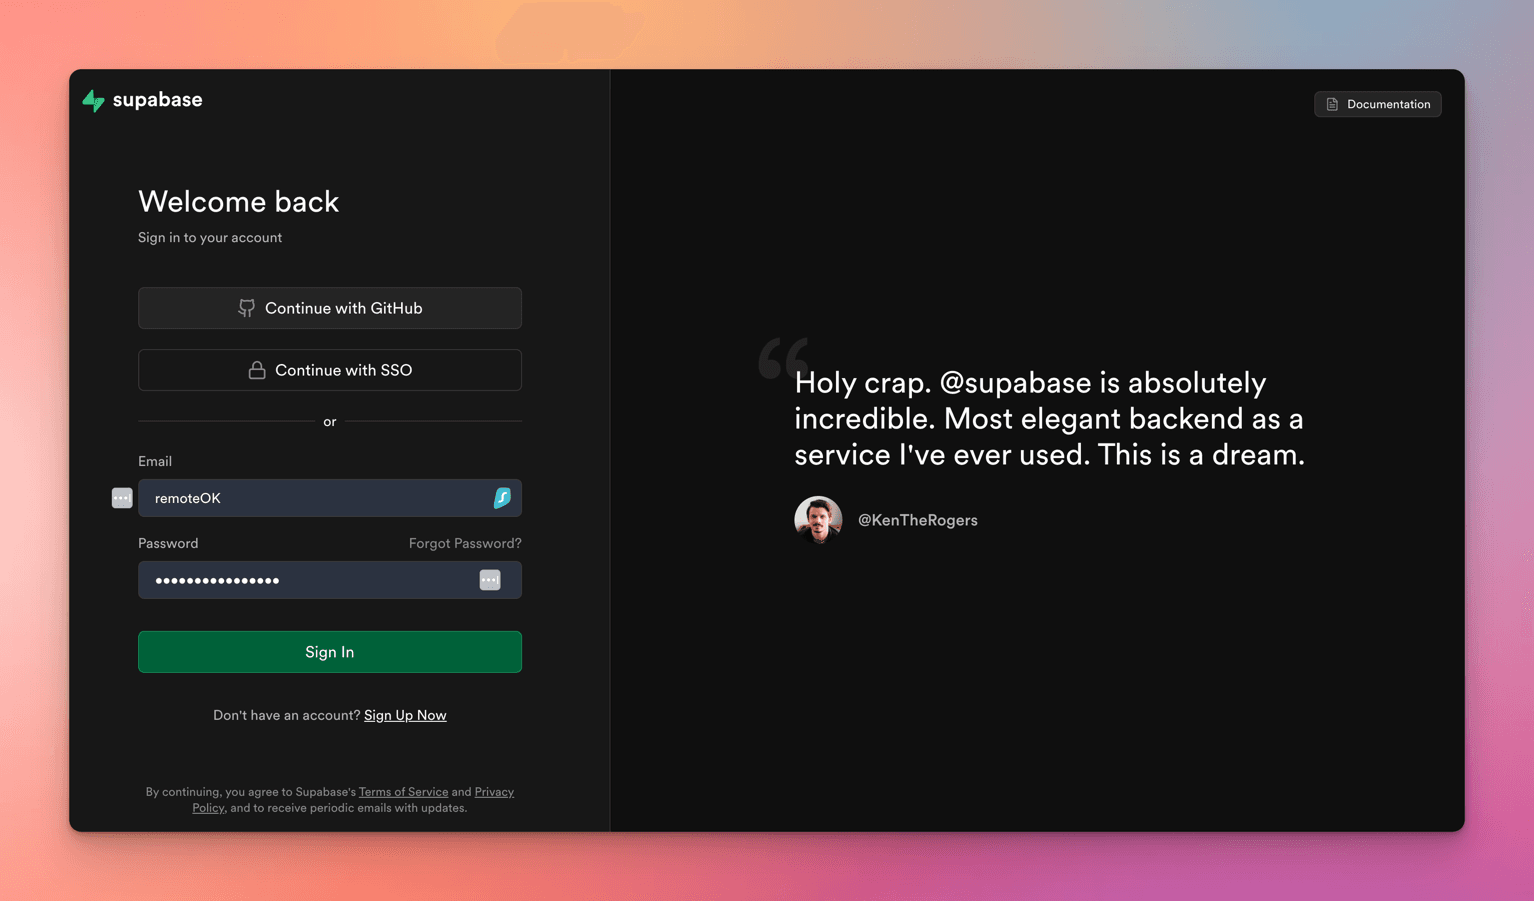
Supabase - You can sign up via GitHub or SSO.
Clerk - You can sign up via GitHub, Google or an Existing email/password combination.
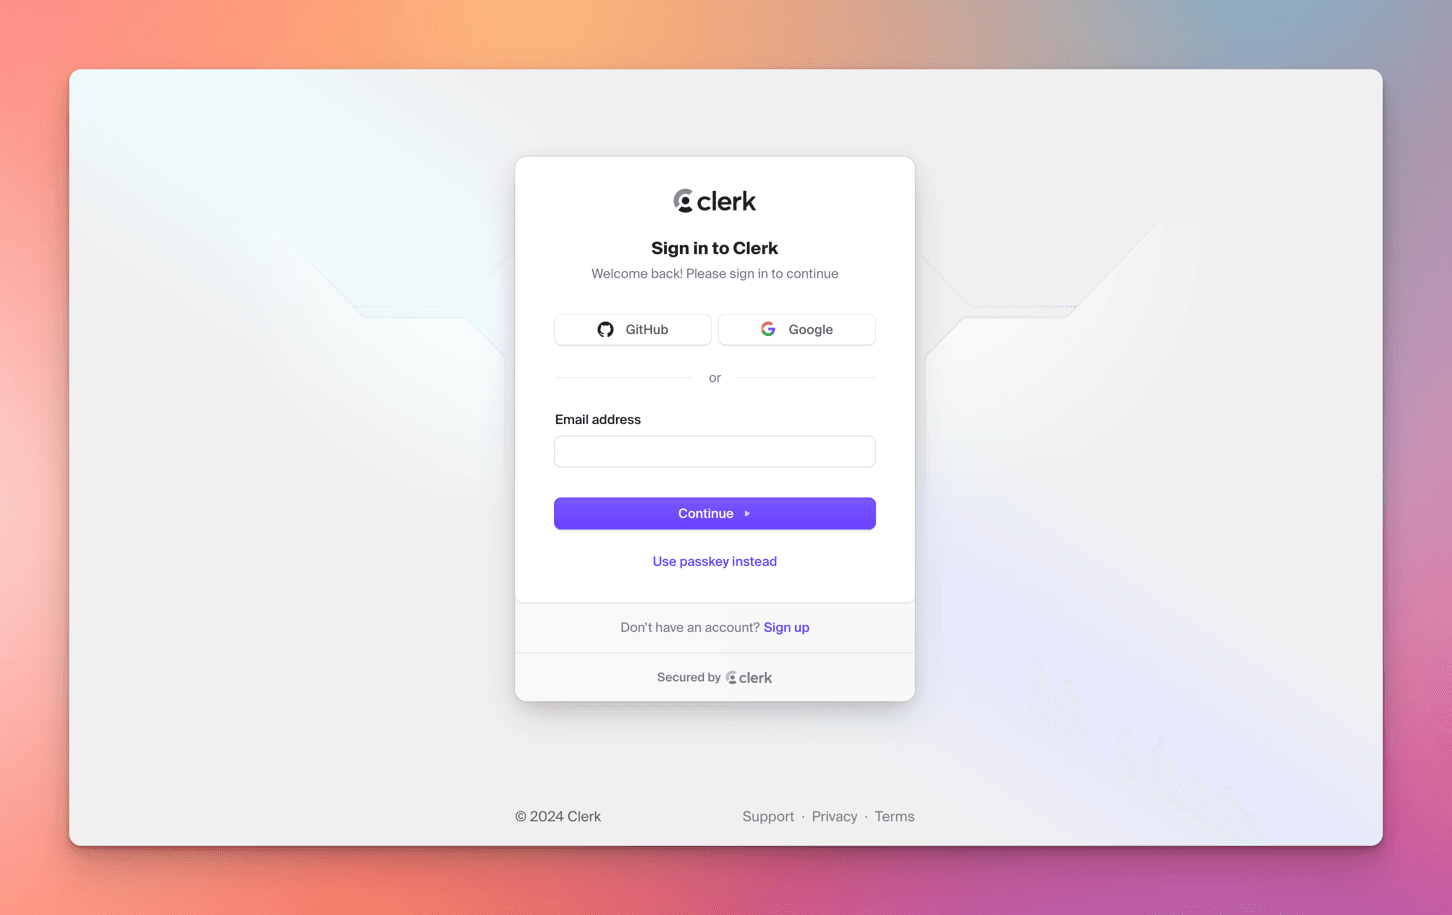
In this article, I've used my GitHub account to sign up to both Supabase and Clerk.
Supabase
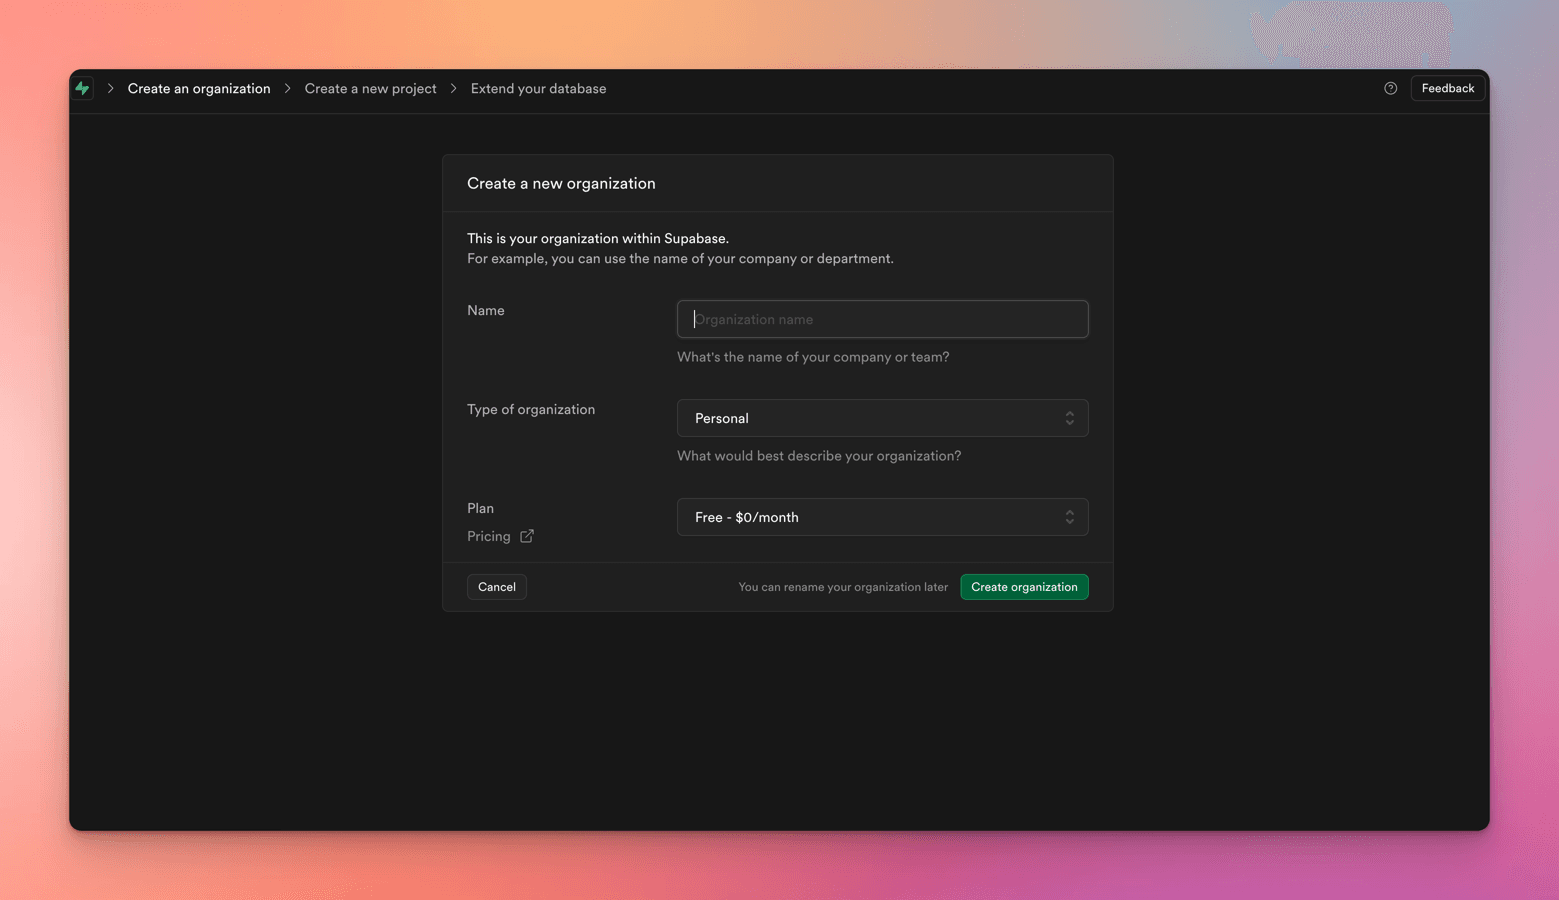
Once you sign up and authorize Supabase to use the GitHub account, You will be asked to create an organization.
-
Name of the Org - can be a valid company/individual name, I have provided the name as "MyXYZCompany".
-
Type of Org - Personal for learning purposes
-
Plan - Free
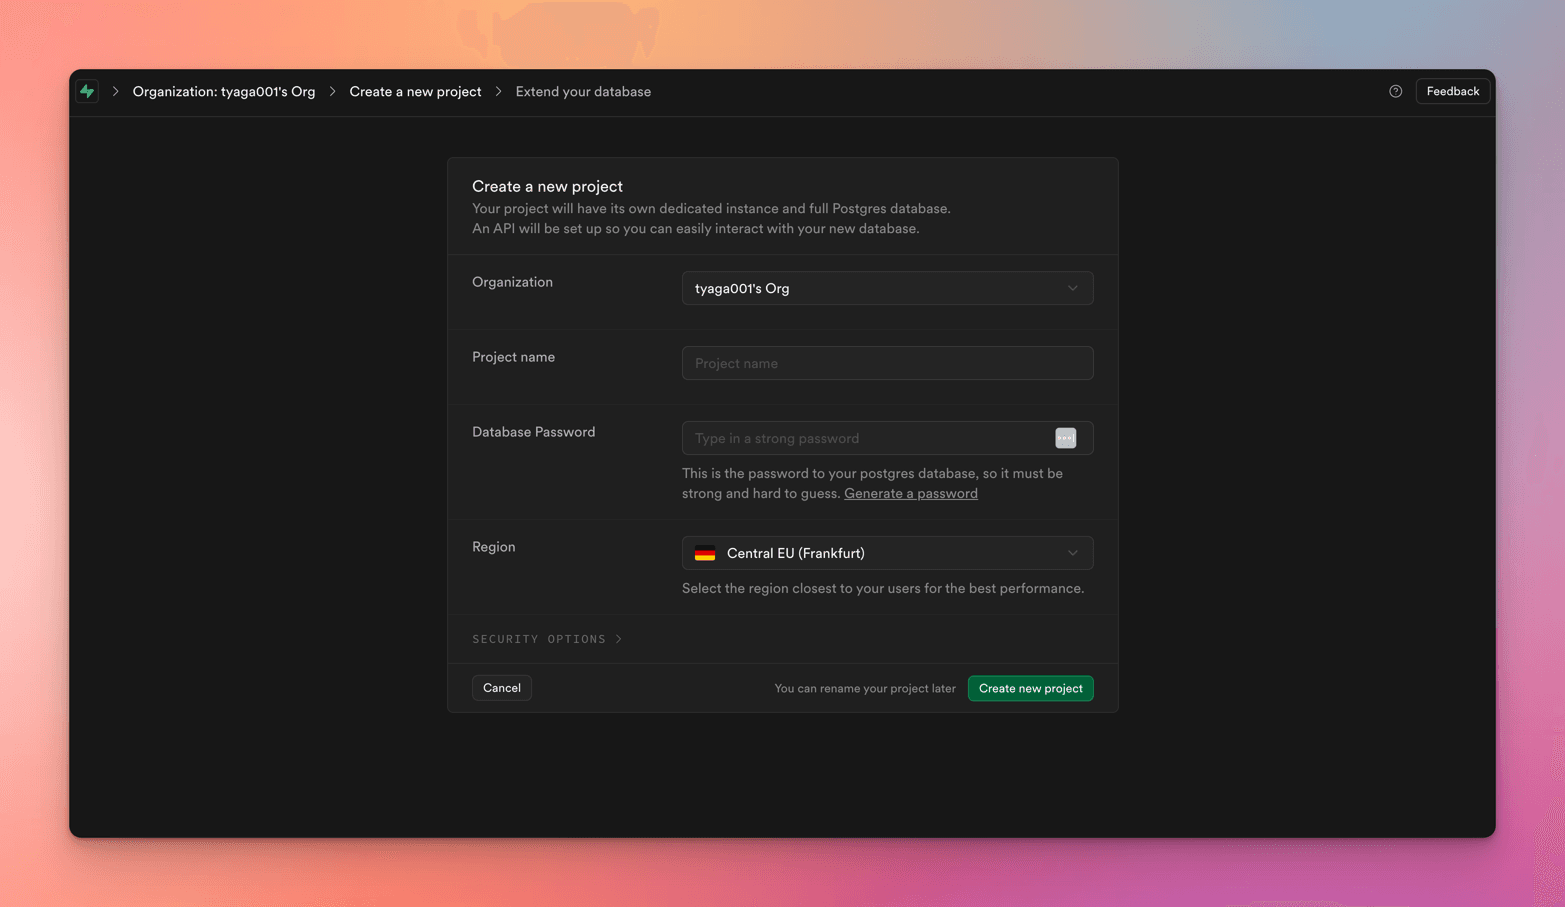
Once you set up the org, you'll get a prompt to add a project - here's what that looks like:
-
Organization - The current org will be pre-populated
-
Project Name - Provide a meaningful project name
-
Database Password - Either provide a strong password, or click on Generate a password, make sure to copy this password somewhere secure, this is used to access the
PostgreSQLDB -
Region - Select the region closest to you
Just give it a minute to set up, and boom - your Dashboard will pop up.
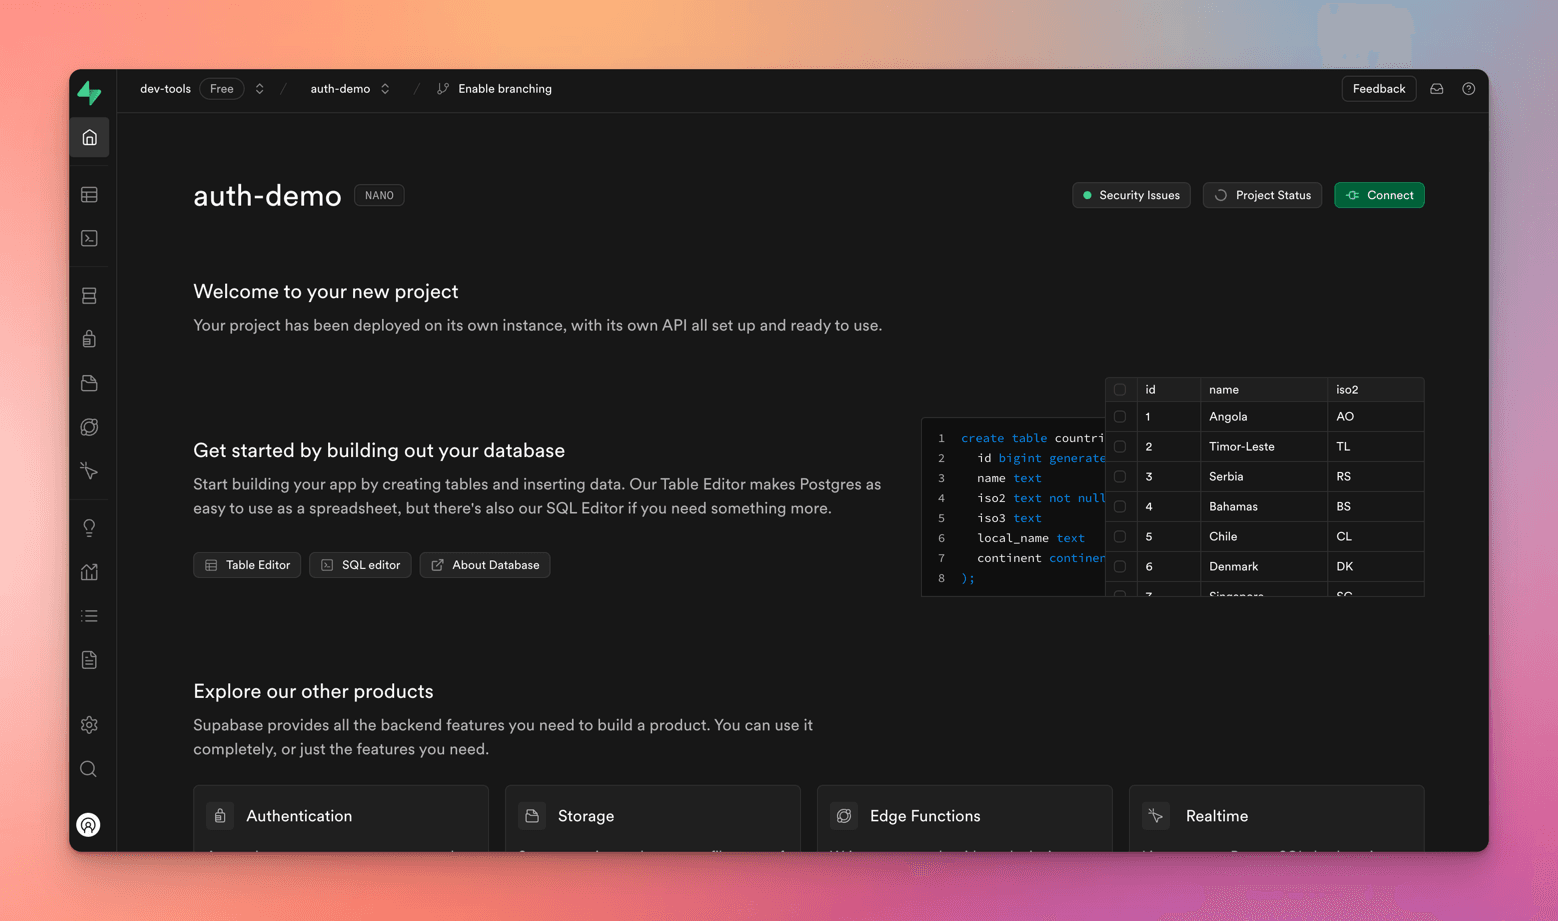
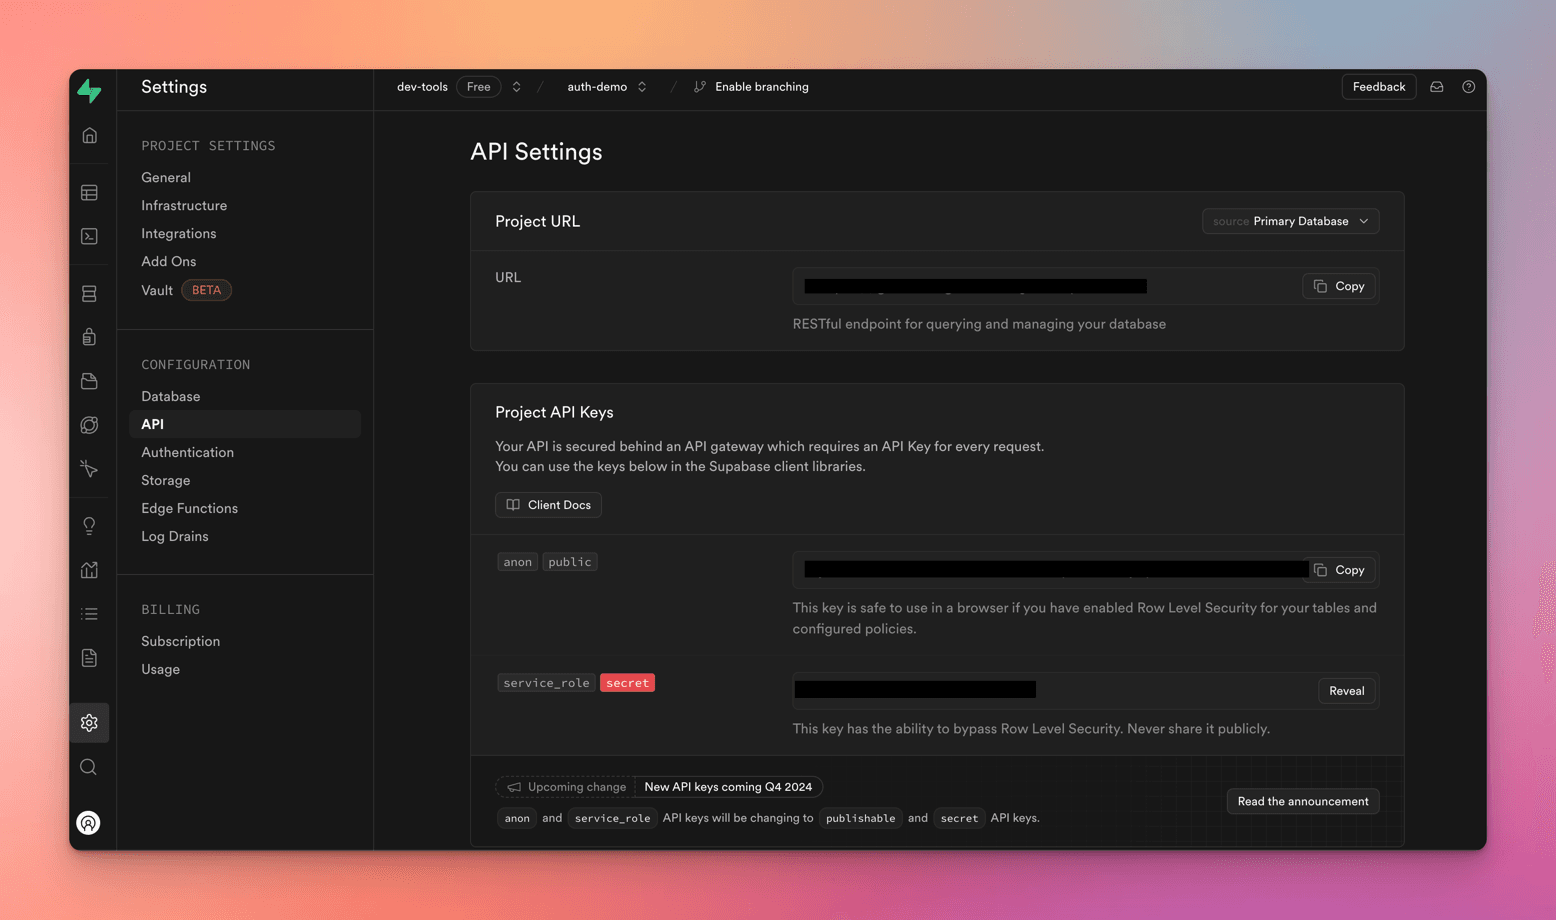
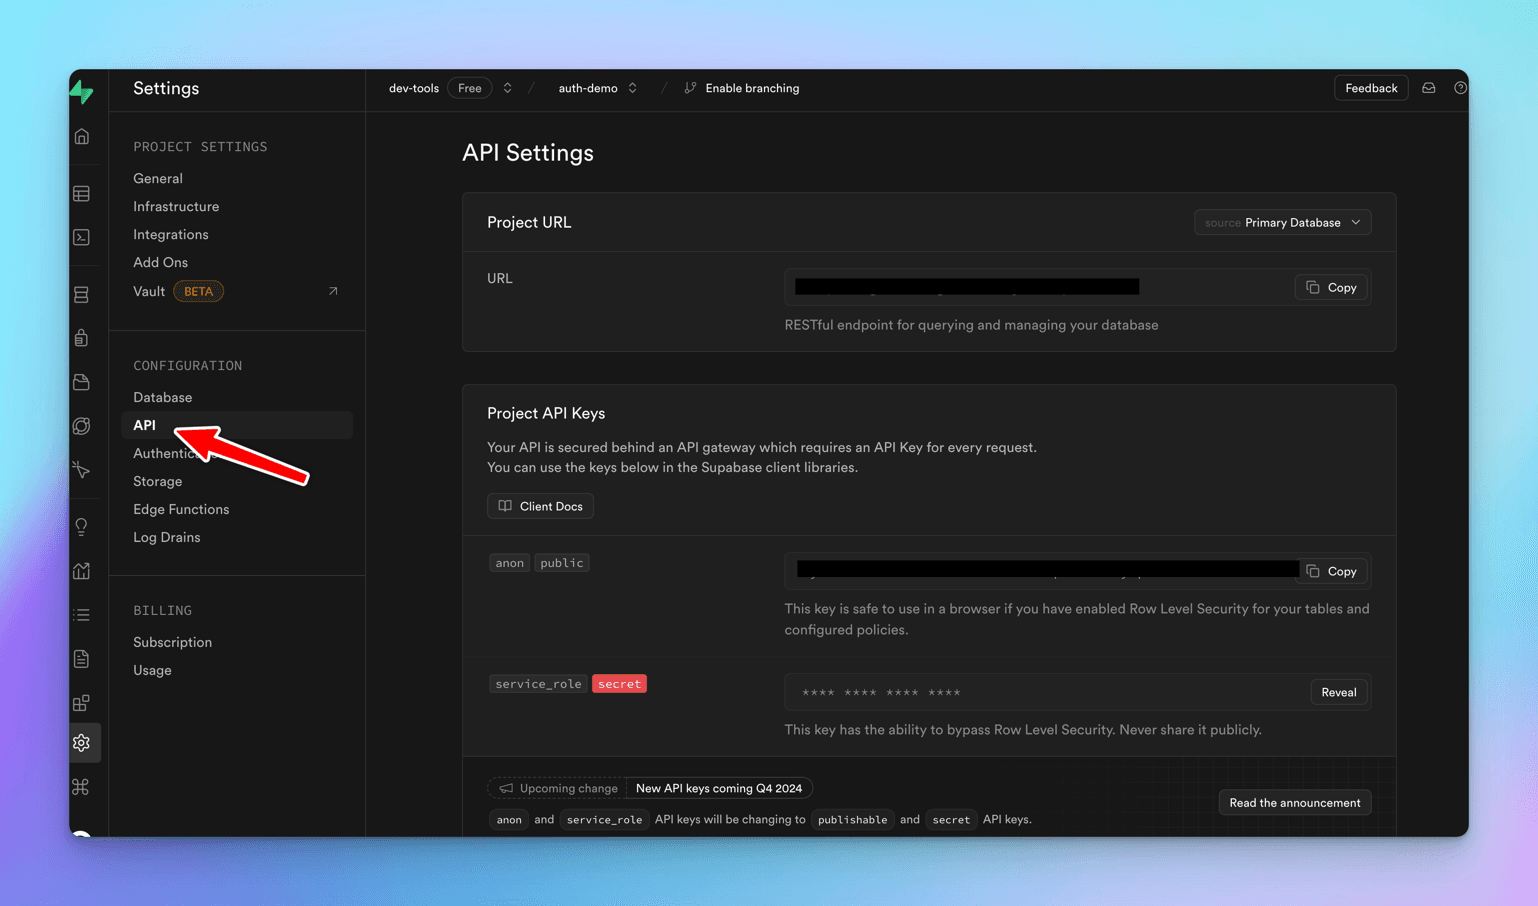
You can see the API keys and settings at Project Settings -> Configuration -> API
These are important URLs and keys that you are going to use further in the demo.
Next, let's setup Clerk.
Clerk
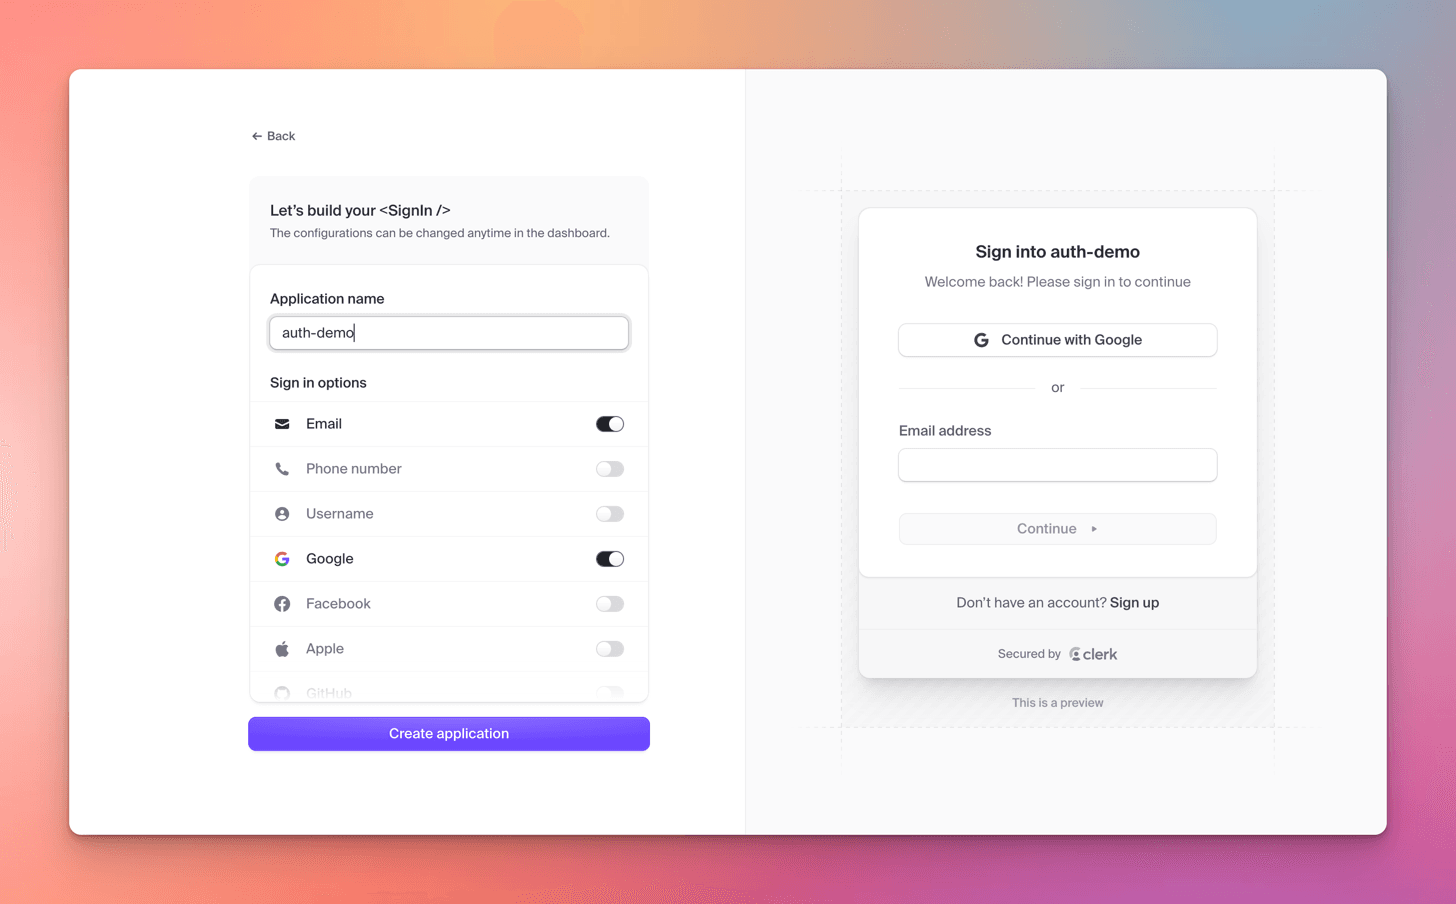
After you sign up to Clerk, You get the below screen to create an app.
- Provide an `app name, by default Clerk provides Email and Google providers.
When you add Clerk auth to your app, you'll get a simple sign-in screen with
Let's use the default options and create the app.
Great - You've created your Clerk app and now you'll see your shiny new Dashboard.
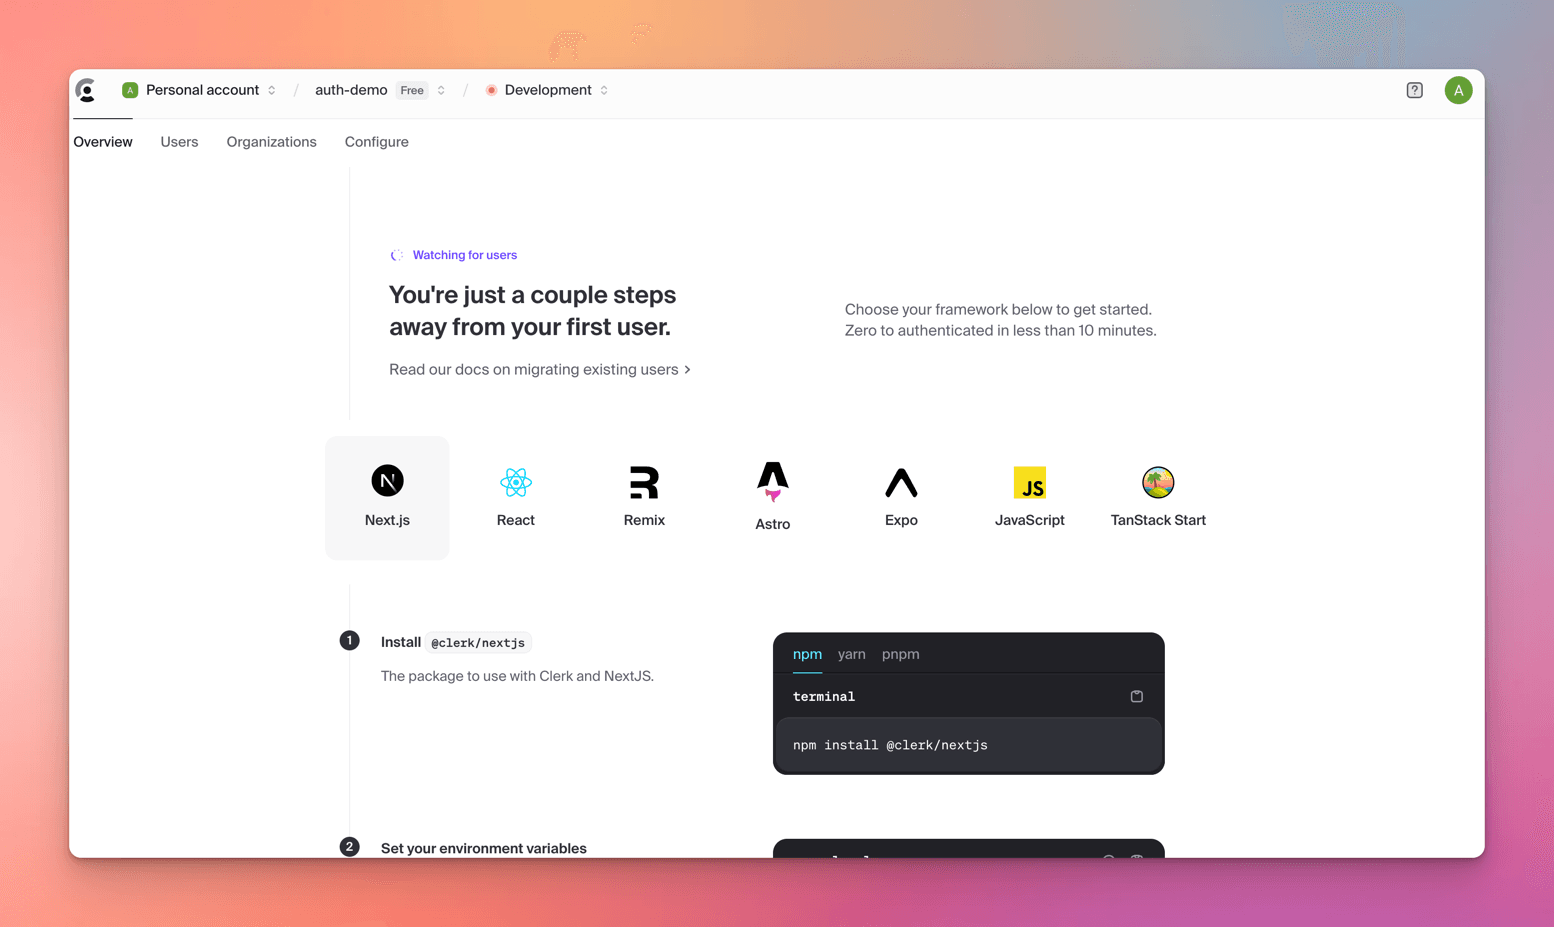
You'll find all your settings, keys, and other important stuff in the Configure screen.
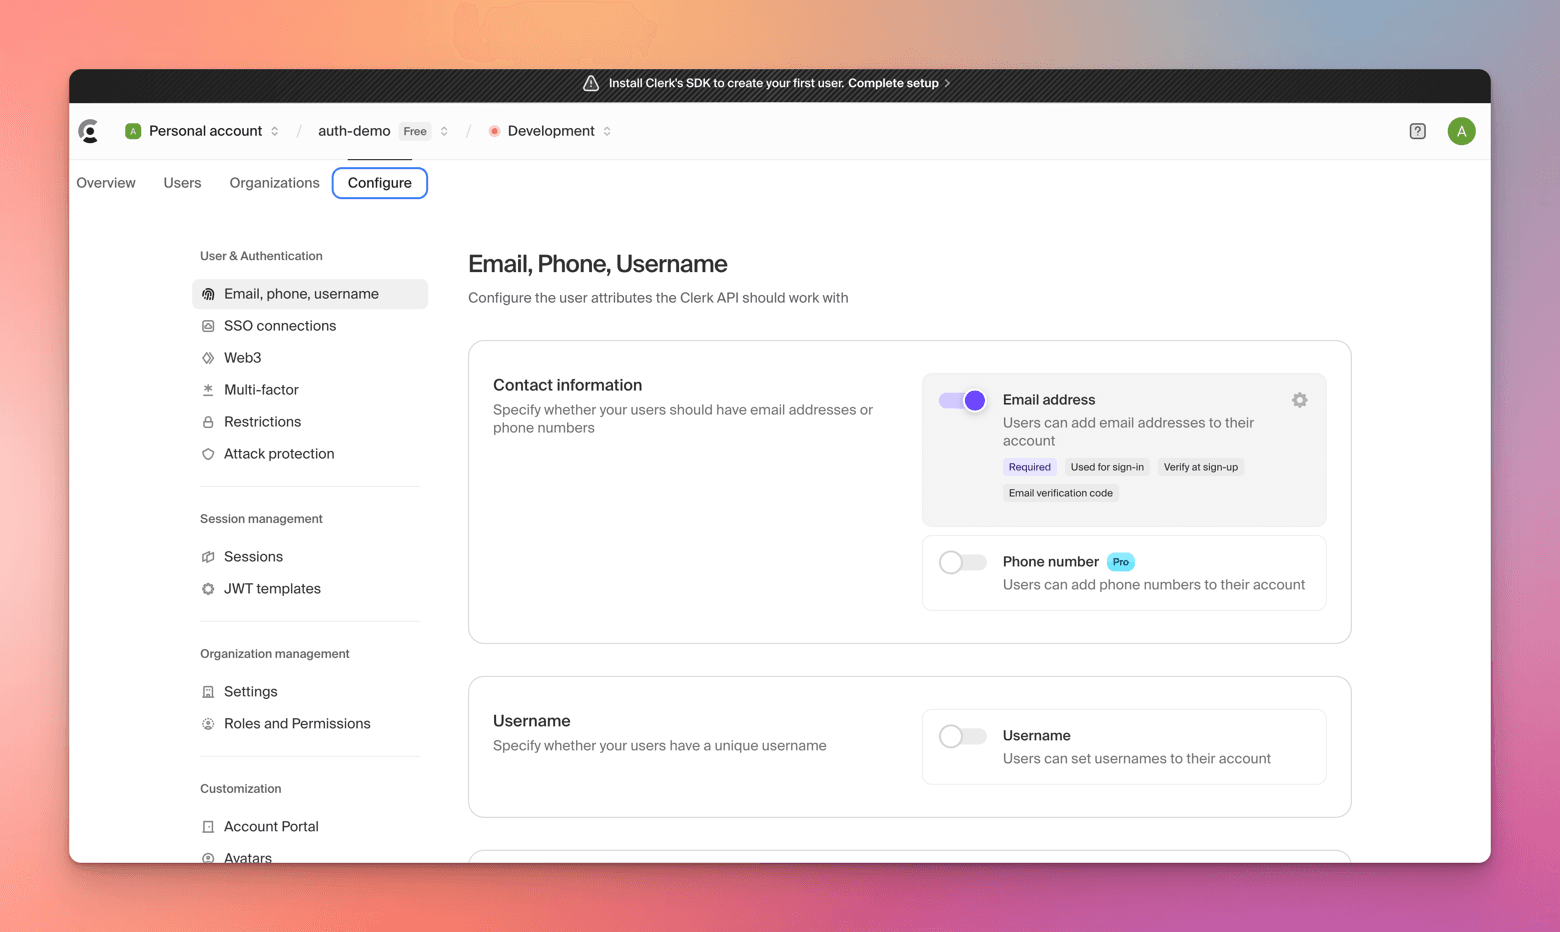
And there you have it - you're all set up with Clerk. 🎉
On User Creation / OnBoarding
Next, let's create users in both Supabase and Clerk to start setting up the Auth components.
I'll use my email (
thewritingwallah@gmail.com) to create accounts on both platforms to show you how it works.
Supabase
-
Go to Authentication tab from the left sidebar -> There are 2 options available in the Add User dropdown
-
Send Invitation
-
Create new user
-
At the moment for default Email provider scenario for Send Invitation option, Supabase has restricted the authentication emails to org specific email addresses. So if we use the Send Invitation option for our test gmail user, it is going to fail.
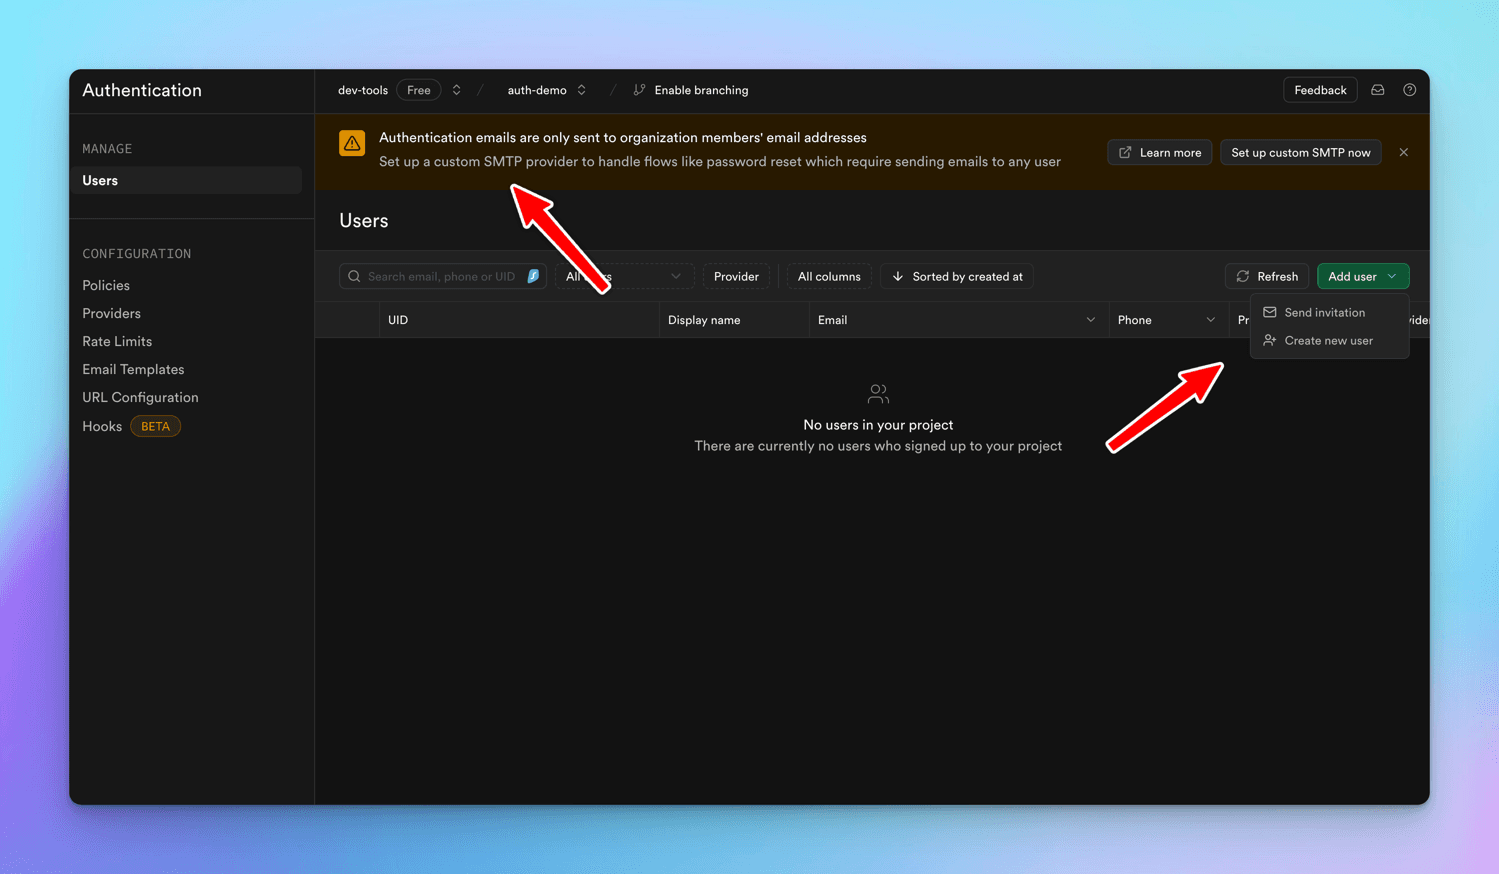
more info on this GitHub Discussion
so hit the Create new user and fill in the details.
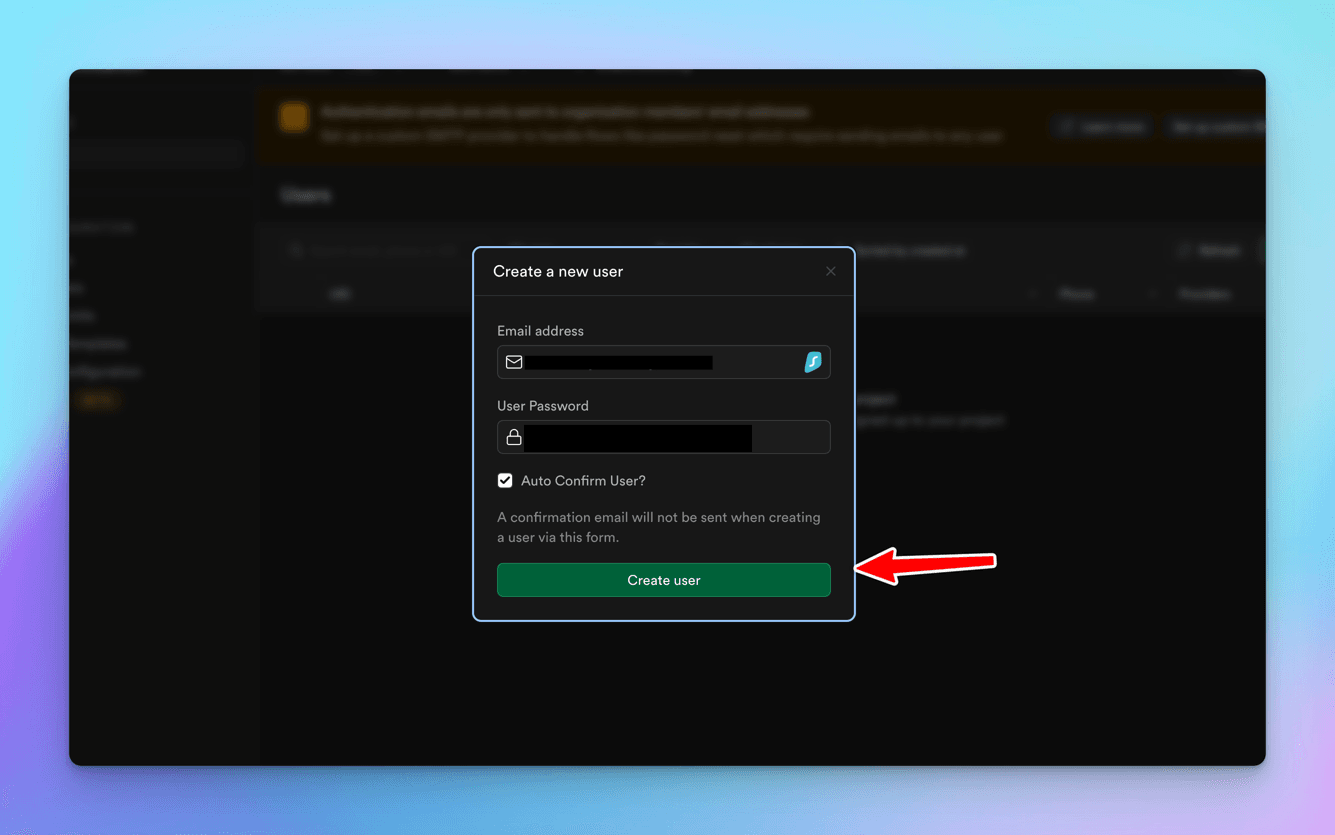
You can see user in the dashboard.
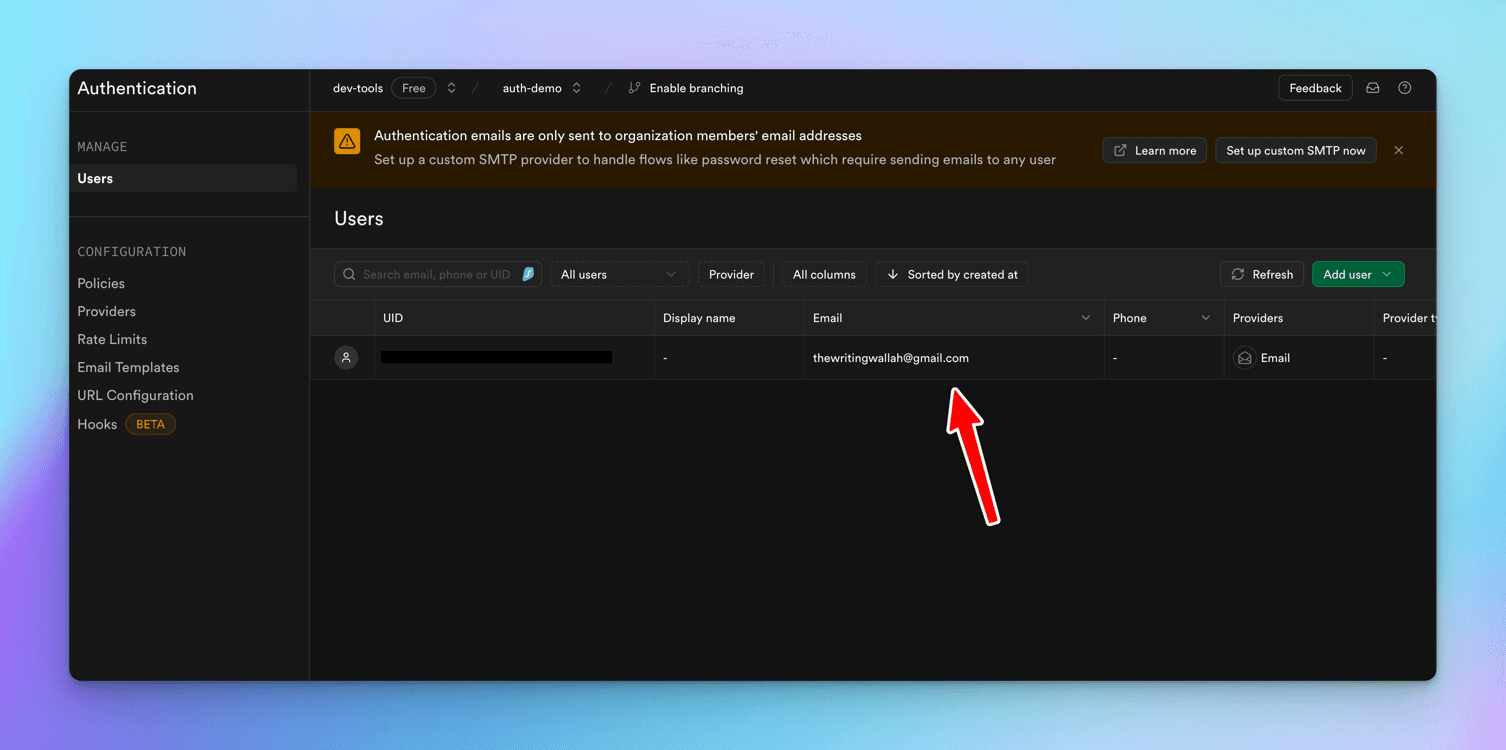
Next, let's see creation/onboarding of users in Clerk.
Clerk
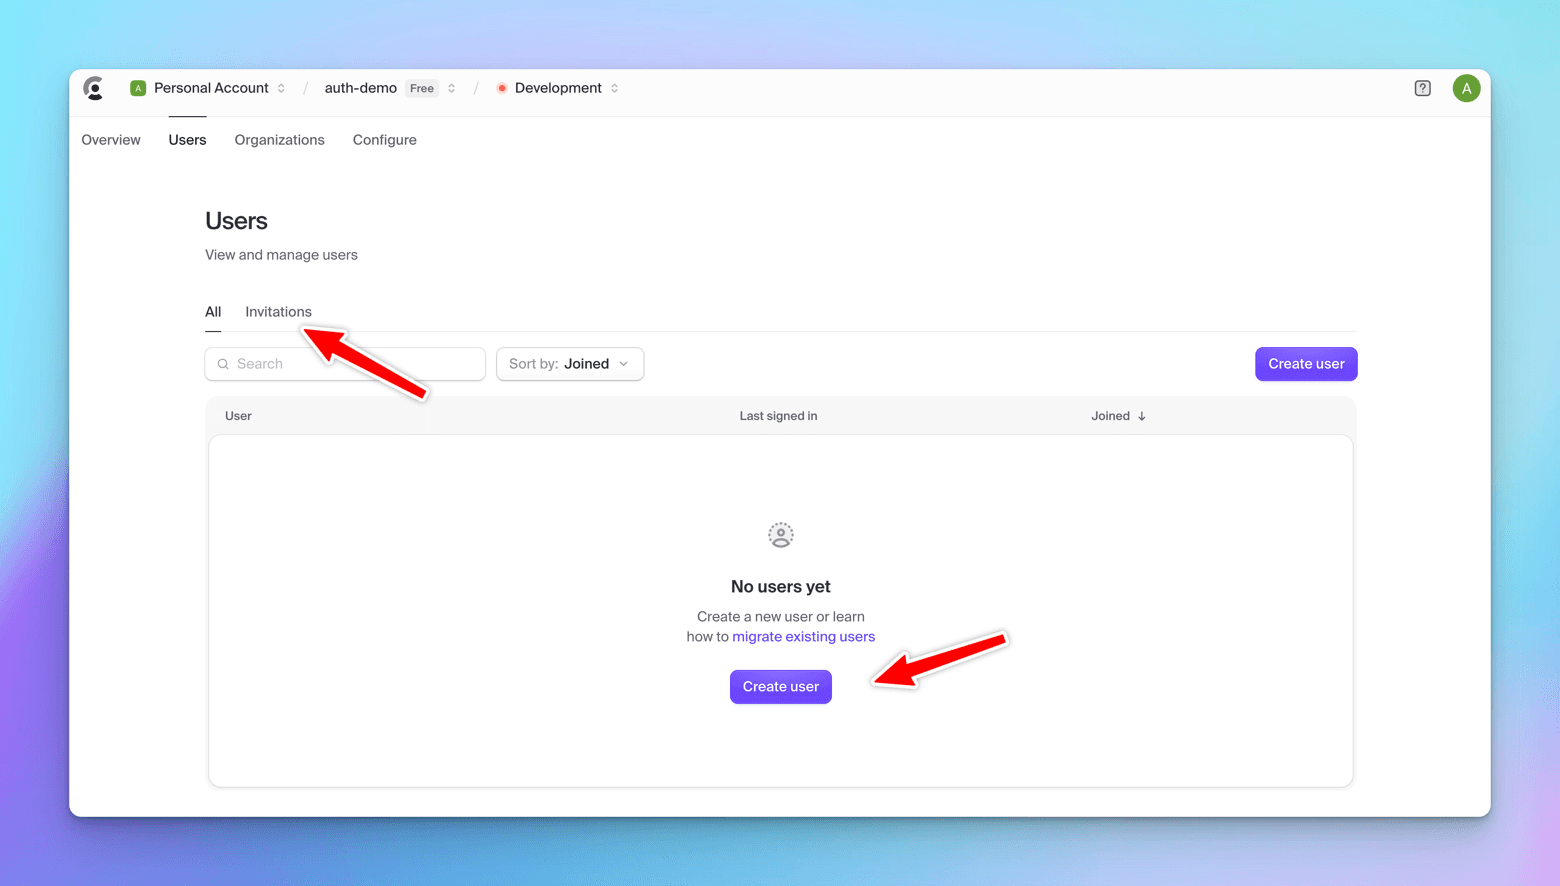
let's head over to the Users page.
You'll see we can either
Createa user right from the dashboard orInviteone.
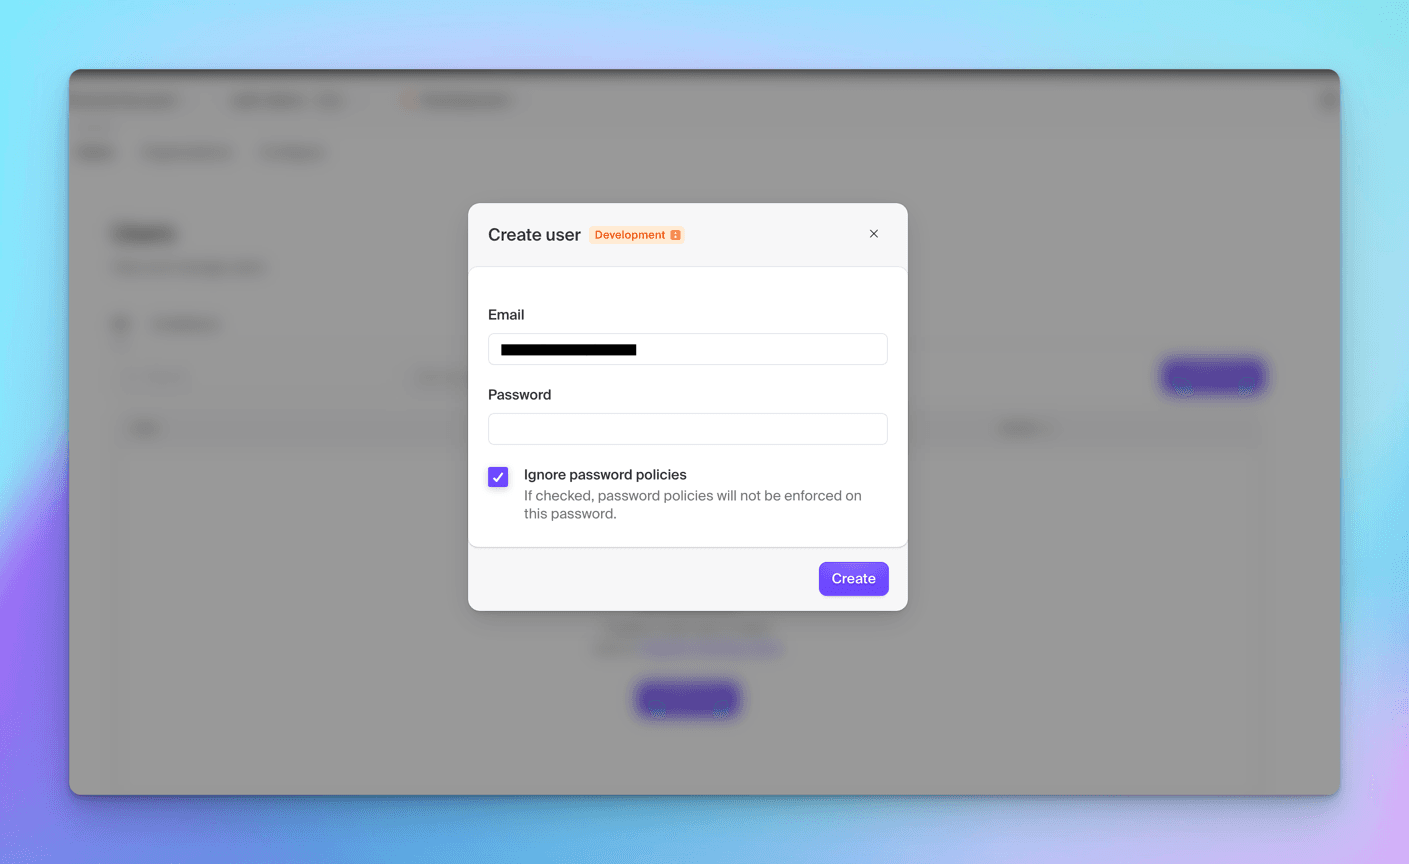
Let's create a user -> fill in the details -> Check the Ignore password policies checkbox for simplicity purposes.
The user gets added to the platform instantly.
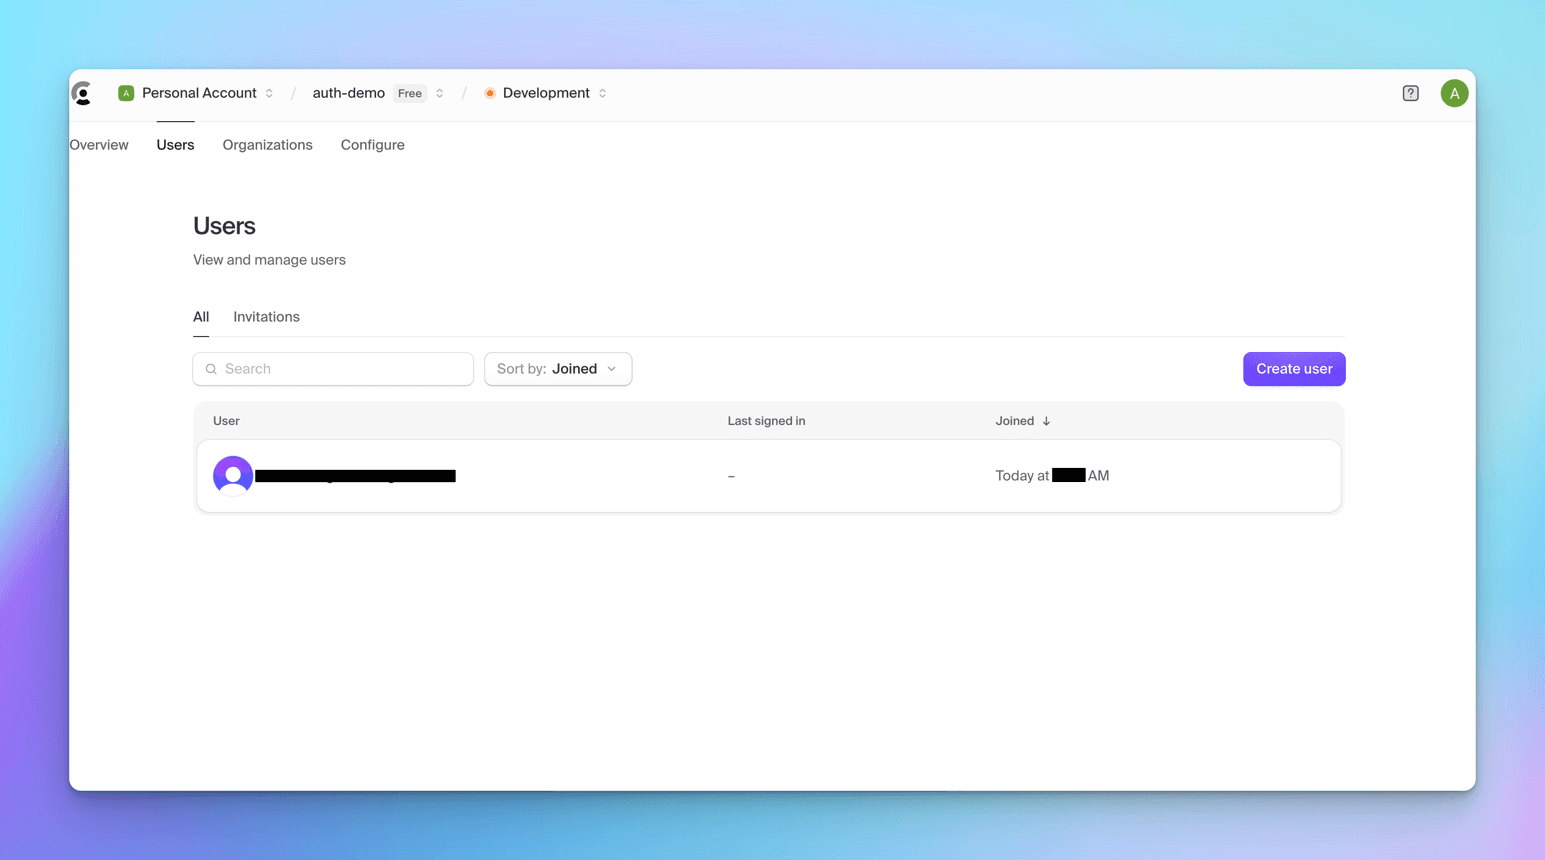
Both Clerk and Supabase make adding users simple and quick.
On Front End Integration - React
Next, let's integrate both Supabase and Clerk Auth in a React app.
Supabase
Let's create a new vite React app.
npm create vite@latest ./
Supabase provides an auth library specifically for React - check out the docs here.
Let's install the required supabase libraries in the React app
npm install @supabase/supabase-js @supabase/auth-ui-react @supabase/auth-ui-shared
Let's create routes -
Home,Login,Success,hookup the react router and create a basic app.
App.jsx
import React from "react";
import { BrowserRouter as Router, Routes, Route } from "react-router-dom";
import Login from "./components/login";
import Success from "./components/success";
import Home from "./components/home";

const App = () => {
  return (
    <>
      <Router>
        <Routes>
          <Route path="/" element={<Home />} />
          <Route path="/login" element={<Login />} />
          <Route path="/success" element={<Success />} />
        </Routes>
      </Router>
    </>
  );
};

export default App;
Grab the Supabase Project URL and Project API Key from your Supabase dashboard, and drop them into the .env.local file in your React app. This will set up the Supabase client, which we'll use to handle user authentication.
These are available at Project Settings -> Configuration -> API
Now, let's add the authentication in the Login component:
Next, add auth in the Login component.
import React, { useEffect, useState } from "react";
import { createClient } from "@supabase/supabase-js";
import { Auth } from "@supabase/auth-ui-react";
import { ThemeSupa } from "@supabase/auth-ui-shared";
import { useNavigate } from "react-router-dom";

const supabaseUrl = import.meta.env.VITE_SUPABASE_URL;
const supabasePublicKey = import.meta.env.VITE_SUPABASE_KEY;
const supabase = createClient(supabaseUrl, supabasePublicKey);

const Login = () => {
  const [event, setEvent] = useState("");
  const navigate = useNavigate();

  useEffect(() => {
    supabase.auth.onAuthStateChange(async (event) => {
      console.log(event);
      if (event === "SIGNED_IN") {
        setEvent(event);
        navigate("/success");
      } else {
        setEvent(event);
        navigate("/login");
      }
    });
  }, [event]);

  return (
    <>
      <div className="container">
        <h1 className="center">Login</h1>
        <Auth
          supabaseClient={supabase}
          appearance={{ theme: ThemeSupa }}
          providers={["github"]}
          theme="dark"
        />
      </div>
    </>
  );
};

export default Login;
Let's break down what's happening in the Login component:
-
First, we import createClient, Auth, and ThemeSupa from the Supabase libraries we installed earlier.
-
createClient needs the project URL and project public key to initialize.
-
In the useEffect hook, we check if the user is logged in using supabase.auth.onAuthStateChange() and navigate to the appropriate routes accordingly.
-
Supabase offers a built-in <Auth /> component, which accepts supabaseClient, appearance, providers, and theme as props.
-
supabaseClient is the object we get from calling createClient.
-
appearance lets us set a Supabase theme for the UI.
-
providers is an array where we can configure OAuth providers like GitHub, Google, Twitter, and more.
Alright, let's run the app.
cd supabse-react
npm run dev
and click on login button and you'll see a supabase theme page.
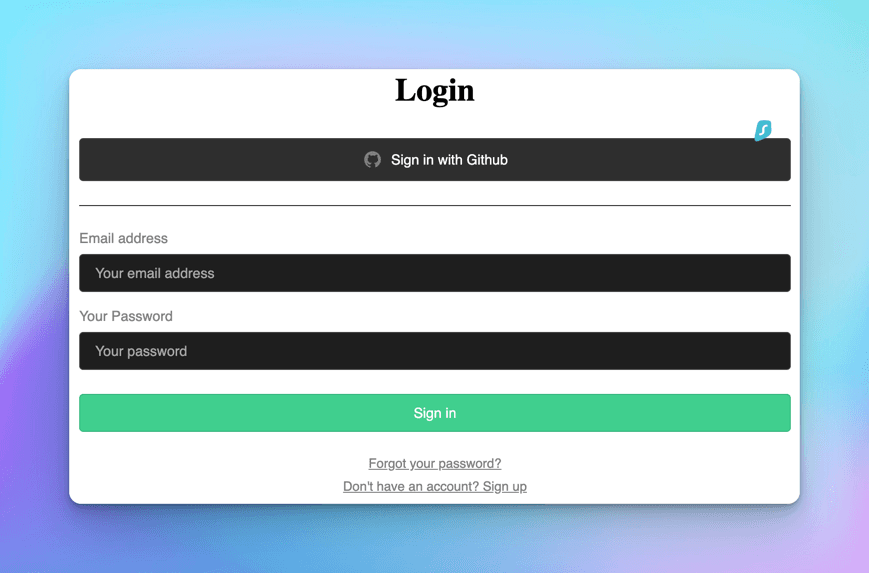
The Supbase's pre-built <Auth /> provides the look and feel, and we don't need to configure any styles for it.
Let's create the Success component that we are going to navigate to post successful login.
import { useNavigate } from "react-router-dom";
import { useEffect, useState } from "react";
import { createClient } from "@supabase/supabase-js";

const supabaseUrl = import.meta.env.VITE_SUPABASE_URL;
const supabasePublicKey = import.meta.env.VITE_SUPABASE_KEY;
const supabase = createClient(supabaseUrl, supabasePublicKey);

const Success = () => {
  const navigate = useNavigate();
  const [user, setUser] = useState("");

  useEffect(() => {
    async function userData() {
      const { data } = await supabase.auth.getUser();
      if (data?.user) {
        setUser(data.user);
      }
    }
    userData();
  }, []);

  async function logOut() {
    await supabase.auth.signOut();
    navigate("/login");
  }

  return (
    <>
      {Object.keys(user).length !== 0 ? (
        <>
          <h1>Success</h1>
          <button onClick={logOut}>LogOut</button>
        </>
      ) : (
        <>
          <h1>User is not logged in</h1>
          <button onClick={() => navigate("/")}>Go back to home</button>
        </>
      )}
    </>
  );
};

export default Success;
Let's walk through what's going on in the Success component:
-
In the useEffect hook, we are trying to set the authenticated user details so that we can find whether he/she has been authenticated or not.
-
If the user details exist, we will display the Success header, along with a logout button, else we will display "user is not logged in" message, along with the "Go back to home" link. This check will also prevent unauthenticated browsing of the success URL directly from the browser.
-
In the logout function, we call the supabase.auth.signout() function and it logouts the user.
Let's login with the test user (thewritingwallah@gmail.com) that we had created earlier.
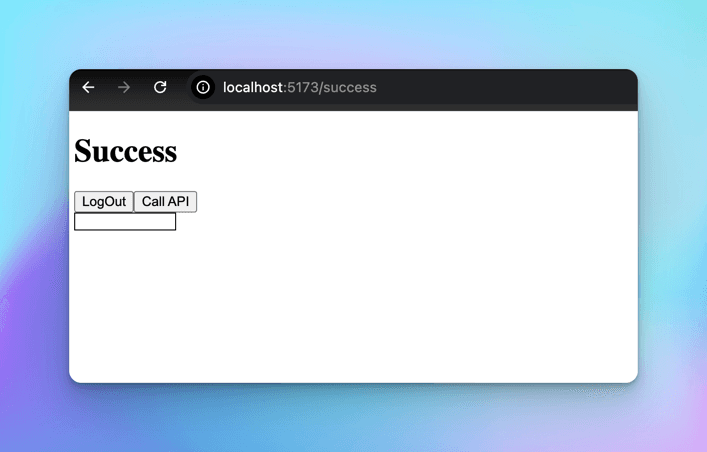
The Supabase authentication with React works great and is super simple.
Now, let's get started with setting up Clerk authentication in our React app.
Clerk
Let's create another React app to integrate Clerk Auth.
Clerk provides us with built in components like <SignInButton />, <UserButton /> <SignedIn />, <SignedOut /> etc to help in the integration.
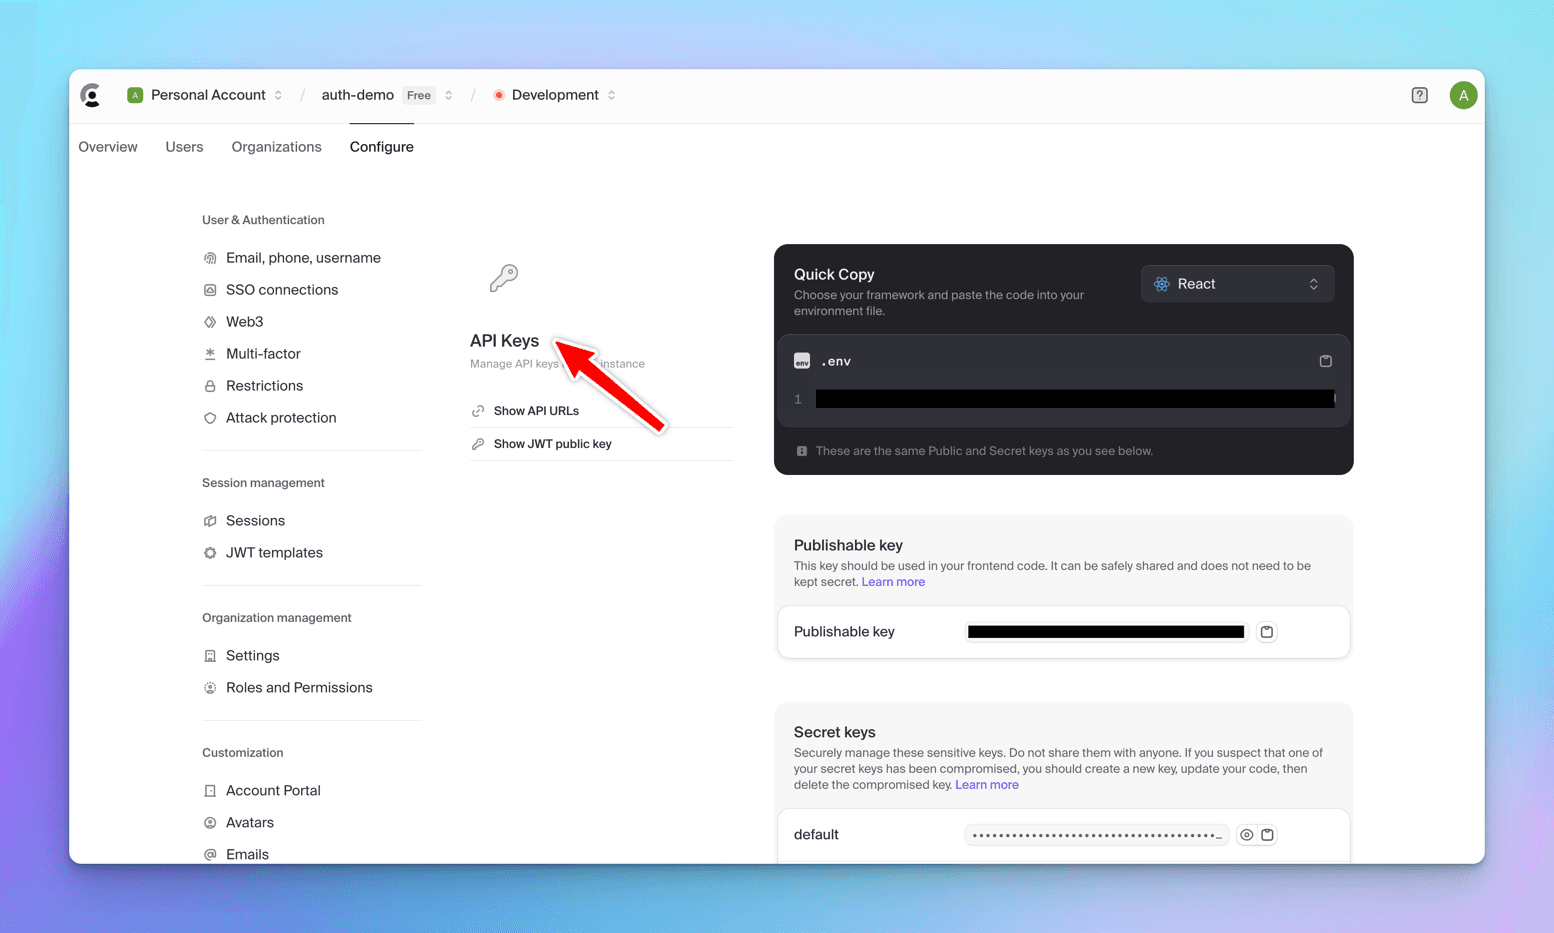
We need to grab the Publishable Key from the Clerk dashboard and add it to our .env.local file for authentication.
You can find this key under Configure -> Developers -> API Keys.
Importing Clerk Dependencies
Let's import the Clerk dependencies in the app.
You can find the details about the required dependencies in the documentation.
npm install @clerk/clerk-react
Now, we need to add the reference to the publishable key in the main component and wrap the code inside a <ClerkProvider /> component.
ClerkProvider expects the publishableKey and afterSignOutUrl as props.
import { StrictMode } from "react";
import { createRoot } from "react-dom/client";
import App from "./App.jsx";
import "./index.css";
import { ClerkProvider } from "@clerk/clerk-react";

const PUBLISHABLE_KEY = import.meta.env.VITE_CLERK_PUBLISHABLE_KEY;
if (!PUBLISHABLE_KEY) {
  throw new Error("Missing Publishable Key");
}

createRoot(document.getElementById("root")).render(
  <StrictMode>
    <ClerkProvider publishableKey={PUBLISHABLE_KEY} afterSignOutUrl="/">
      <App />
    </ClerkProvider>
  </StrictMode>
);
Now, let's hook up the auth in the App component.
import "./App.css";
import {
  SignedIn,
  SignedOut,
  SignInButton,
  UserButton,
} from "@clerk/clerk-react";

import Success from "./components/success";
function App() {
  return (
    <>
      <h1>Clerk Auth</h1>
      <header>
        <SignedOut>
          <SignInButton />
        </SignedOut>
        <SignedIn>
          <UserButton />
          <Success />
        </SignedIn>
      </header>
    </>
  );
}

export default App;
Let's break down what's happening in the code:
-
We import the pre-built SignedIn, SignedOut, UserButton, SignInButton from clerk React library.
-
We wrap SignInButtton inside SignedOut component, which means it will show the sign-in button only when the user isn't logged in.
Now, let's run the app and click on the SignIn button.
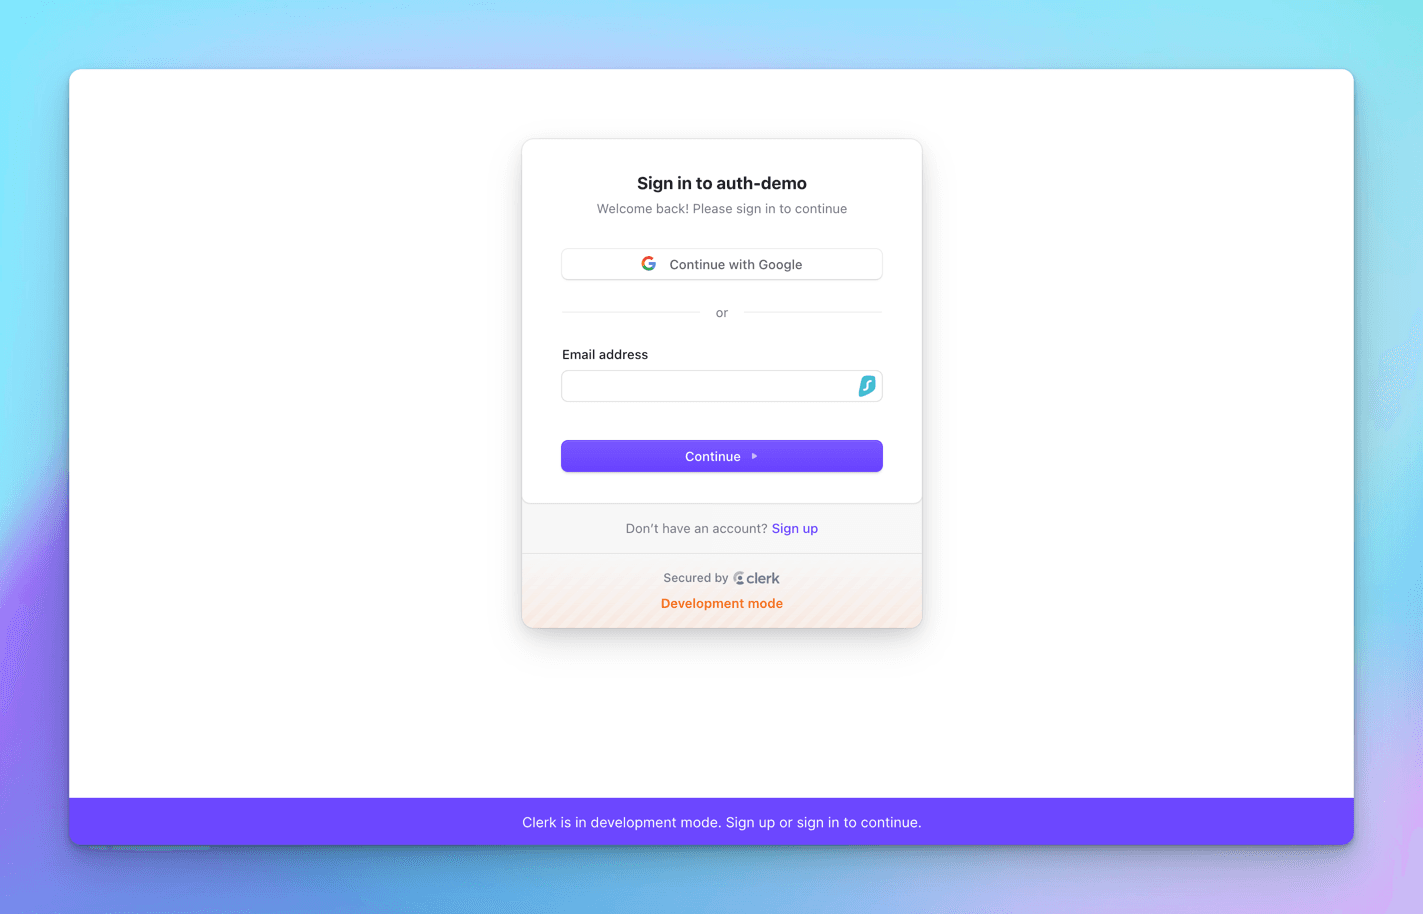
Let's enter the test user we created on the Clerk dashboard: thewritingwallah@gmail.com, and then click Continue. After that, enter the password and click Continue. If everything goes well, you'll see a success message and be taken to the next page.
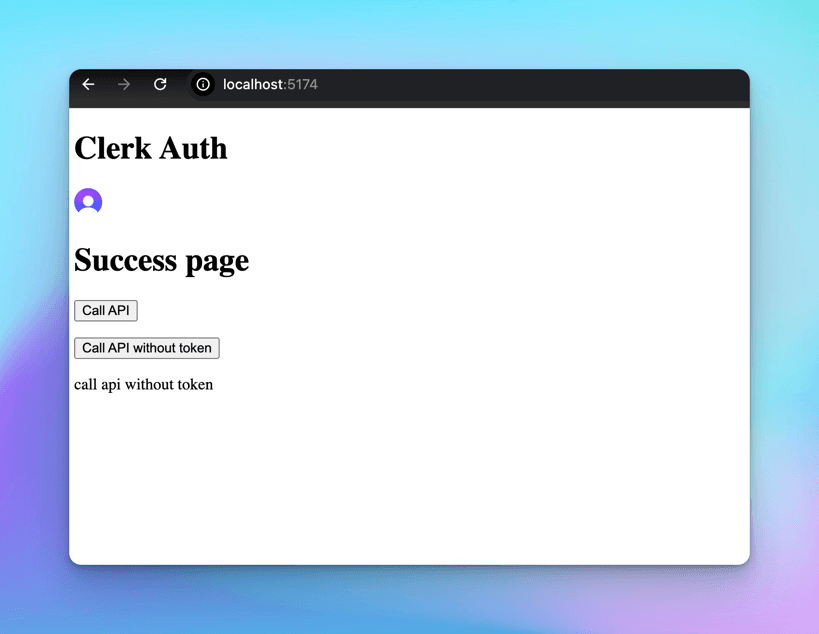
The <UserButton /> component shows up, and when you click on it, you can see the basic details of your account.
Clerk authentication with React is super smooth and really easy to set up.
On Backend Integration - .NET 8 Web APIs
We've learned how to integrate our React apps with both Supabase and Clerk.
But just the front end isn't enough; we always need a backend to support a data-driven app. So, let's look at how Supabase and Clerk fit into the backend.
In this section, let's build a sample .NET 8 Web APIs, secure them with Supabase and Clerk auth, and call those protected APIs from our secure React front end.
Let's keep building.
Supabase
Let's create a new .NET 8 Web API app.
dotnet new webapi
We'll be using the below Nuget package to work with the Supabase JWT tokens.
dotnet add package Microsoft.AspNetCore.Authentication.JwtBearer --version 8.0.8
Let's open the Program.cs file of the web api solution and add support for JWT auth.
    public class Program
    {
        public static void Main(string[] args)
        {
            var builder = WebApplication.CreateBuilder(args);
            var configuration = builder.Configuration;

            // Add services to the container.

            builder.Services.AddControllers();
            // Learn more about configuring Swagger/OpenAPI at https://aka.ms/aspnetcore/swashbuckle
            builder.Services.AddEndpointsApiExplorer();
            builder.Services.AddSwaggerGen();

            builder.Services.AddAuthentication(JwtBearerDefaults.AuthenticationScheme)
                .AddJwtBearer(JwtBearerDefaults.AuthenticationScheme, options =>
                {
                    options.TokenValidationParameters = new TokenValidationParameters
                    {
                        ValidateAudience = true,
                        ValidateIssuer = true,
                        ValidateIssuerSigningKey = true,
                        ValidIssuer = configuration["SupabaseSettings:Issuer"],
                        ValidAudience = configuration["SupabaseSettings:Audience"],
                        IssuerSigningKey = new SymmetricSecurityKey(Encoding.UTF8.GetBytes(configuration["SupabaseSettings:SecretKey"]))
                    };
                });

            builder.Services.AddCors(options =>
            {
                options.AddPolicy("Cors", p =>
                {
                    p.AllowAnyHeader().AllowAnyMethod().AllowAnyOrigin();
                });
            });

            var app = builder.Build();

            // Configure the HTTP request pipeline.
            if (app.Environment.IsDevelopment())
            {
                app.UseSwagger();
                app.UseSwaggerUI();
            }

            app.UseHttpsRedirection();
            app.UseCors("Cors");

            app.UseAuthentication();
            app.UseAuthorization();


            app.MapControllers();

            app.Run();
        }
    }
Here's what we've done:
-
We've added support for JWT authentication using builder.Services.AddAuthentication().
-
The token validation now includes all the important parameters:
-
ValidateAudience is set to true.
-
ValidateIssuer is set to true.
-
ValidateIssuerSigningKey is set to true.
-
We've also specified the ValidIssuer, ValidAudience, and IssuerSigningKey.
-
For ValidIssuer, we have "SupabaseProjectURL/auth/v1".
-
The ValidAudience is set to "authenticated".
-
For IssuerSigningKey, we use the JWT secret from the Supabase API dashboard.
Just a heads-up - this is a sensitive key, so keep it safe and don't share it or check it into source control.
Now, let's add these settings in the appsettings.json file and use the Configuration pattern to get them in the Program.cs file.
  "SupabaseSettings": {
    "Issuer": "https://vcripehfbbgogiwvzbgo.supabase.co/auth/v1",
    "Audience": "authenticated",
    "SecretKey": "SECRET JWT KEY FROM SUPABASE DASHBOARD"
  }
Now, let's create a ValuesController and a protected GET endpoint "names".
[Route("api/[controller]")]
    [ApiController]
    public class ValuesController : ControllerBase
    {
        public class Employee
        {
            public int Id { get; set; }
            public string Name { get; set; }
            public string Department { get; set; }
        }

        [Authorize]
        [HttpGet("names")]
        public IActionResult GetEmployee()
        {
            var emp = new Employee
            {
                Id = 101,
                Name = "John Doe",
                Department = "IT"
            };

            return Ok(emp);
        }
    }
We would get a 401 UnAuthorized once we try to access the endpoint without an authenticated user.
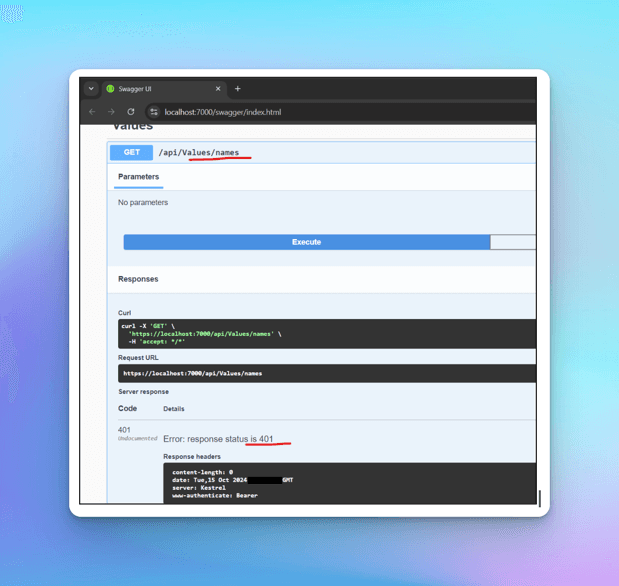
We would need a token to access the endpoint, let's integrate this API into the React app and use the authenticated user token to access the endpoint.
Let's make changes to the React app success component to call the protected API.
import { useNavigate } from "react-router-dom";
import { useEffect, useState } from "react";
import { createClient } from "@supabase/supabase-js";
import axios from "axios";

const supabaseUrl = import.meta.env.VITE_SUPABASE_URL;
const supabasePublicKey = import.meta.env.VITE_SUPABASE_KEY;
const supabase = createClient(supabaseUrl, supabasePublicKey);

const Success = () => {
  const navigate = useNavigate();
  const [user, setUser] = useState("");
  const [token, setToken] = useState("");
  const [emp, setEmp] = useState({});

  useEffect(() => {
    async function userData() {
      const { data } = await supabase.auth.getUser();
      if (data?.user) {
        setUser(data.user);

        const item = localStorage.getItem("sb-vcripehfbbgogiwvzbgo-auth-token");
        const parsedItem = JSON.parse(item);
        const accessToken = parsedItem["access_token"];

        setToken(accessToken);
      }
    }
    userData();
  }, []);

  async function logOut() {
    await supabase.auth.signOut();
    navigate("/login");
  }

  async function callAPI() {
    const API_URL = "https://localhost:7000/api/Values/names";
    const config = {
      headers: {
        Authorization: `Bearer ${token}`,
      },
    };

    const response = await axios.get(API_URL, config);
    setEmp(response.data);
  }

  return (
    <>
      {Object.keys(user).length !== 0 ? (
        <>
          <h1>Success</h1>
          <button onClick={logOut}>LogOut</button>
          <button onClick={callAPI}>Call API</button>
          <div className="empContainer">
            <p>{emp.id}</p>
            <p>{emp.name}</p>
            <p>{emp.department}</p>
          </div>
        </>
      ) : (
        <>
          <h1>User is not logged in</h1>
          <button onClick={() => navigate("/")}>Go back to home</button>
        </>
      )}
    </>
  );
};

export default Success;
We have a:
-
Call API button, on the click of which we have a function callAPI(). We use axios to call the external API, We extract the user token from the local storage and bind it to the Authorization header of the API call.
-
We bind the Employee details on successful response of the API.
Now, Let's run both React/.NET apps and see them in action.
- Login to the
Reactapp - Click on the Call
APIbutton - The control comes over to the protected "names" endpoint on the
.NETAPI side

API data successfully appears on the UI.
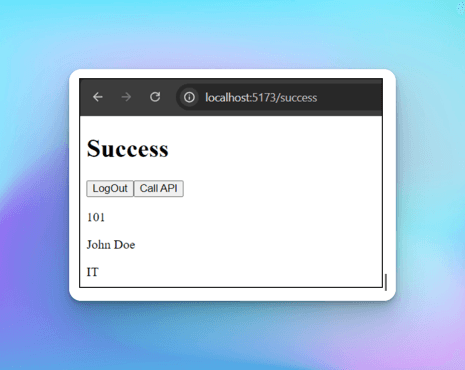
So, we have successfully authenticated with Supabase in both frontend and backend. The logged-in user is able to access the protected API.
Clerk
Let's see how we can integrate Clerk auth in .NET 8 Web API.
Create a new .NET 8 Web API app.
dotnet new webapi
Add the JWT Nuget package to work with the Clerk auth.
dotnet add package Microsoft.AspNetCore.Authentication.JwtBearer --version 8.0.8
In the Program.cs file, add this code.
using Microsoft.AspNetCore.Authentication.JwtBearer;
using Microsoft.IdentityModel.Tokens;
using System.Text;

namespace Clerk.Auth
{
    public class Program
    {
        public static void Main(string[] args)
        {
            var builder = WebApplication.CreateBuilder(args);
            var configuration = builder.Configuration;

            // Add services to the container.

            builder.Services.AddControllers();
            // Learn more about configuring Swagger/OpenAPI at https://aka.ms/aspnetcore/swashbuckle
            builder.Services.AddEndpointsApiExplorer();
            builder.Services.AddSwaggerGen();

            builder.Services.AddAuthentication(JwtBearerDefaults.AuthenticationScheme)
                .AddJwtBearer(JwtBearerDefaults.AuthenticationScheme, options =>
                {
                    options.Authority = configuration["ClerkSettings:Authority"];
                    options.TokenValidationParameters = new TokenValidationParameters
                    {
                        ValidateAudience = false,
                        ValidateIssuer = false,
                        ValidateIssuerSigningKey = true,
                        IssuerSigningKey = new SymmetricSecurityKey(Encoding.UTF8.GetBytes(configuration["ClerkSettings:SecretKey"]))
                    };
                    options.Events = new JwtBearerEvents
                    {
                        OnTokenValidated = context =>
                        {
                            var principal = context.Principal;
                            var azpClaim = principal?.Claims.FirstOrDefault(x=>x.Type=="azp");
                            if(azpClaim is null || azpClaim.Value != builder.Configuration["ClerkSettings:AZP"])
                            {
                                context.Fail("AZP Claim is invalid or missing");
                            }
                            return Task.CompletedTask;
                        },
                        OnMessageReceived = context =>
                        {
                            return Task.CompletedTask;
                        }
                    };
                });

            builder.Services.AddCors(options =>
            {
                options.AddPolicy("Cors", p =>
                {
                    p.AllowAnyHeader().AllowAnyMethod().AllowAnyOrigin();
                });
            });

            var app = builder.Build();

            // Configure the HTTP request pipeline.
            if (app.Environment.IsDevelopment())
            {
                app.UseSwagger();
                app.UseSwaggerUI();
            }

            app.UseHttpsRedirection();
            app.UseCors("Cors");

            app.UseAuthentication();
            app.UseAuthorization();

            app.MapControllers();

            app.Run();
        }
    }
}
We have:
-
Added support for JWT auth scheme using builder.Services.AddAuthentication() builder.
-
The token validation parameters have all the mandatory parameters:
-
Authority as Clerk project URL
-
ValidateAudience as false
-
ValidateIssuer as false
-
ValidateIssuerSigningKey as true
-
IssuerSigningKey
-
AZP is Authorized Party = "http://localhost:5173"
-
SecretKey = The JWT secret from the Clerk API dashboard
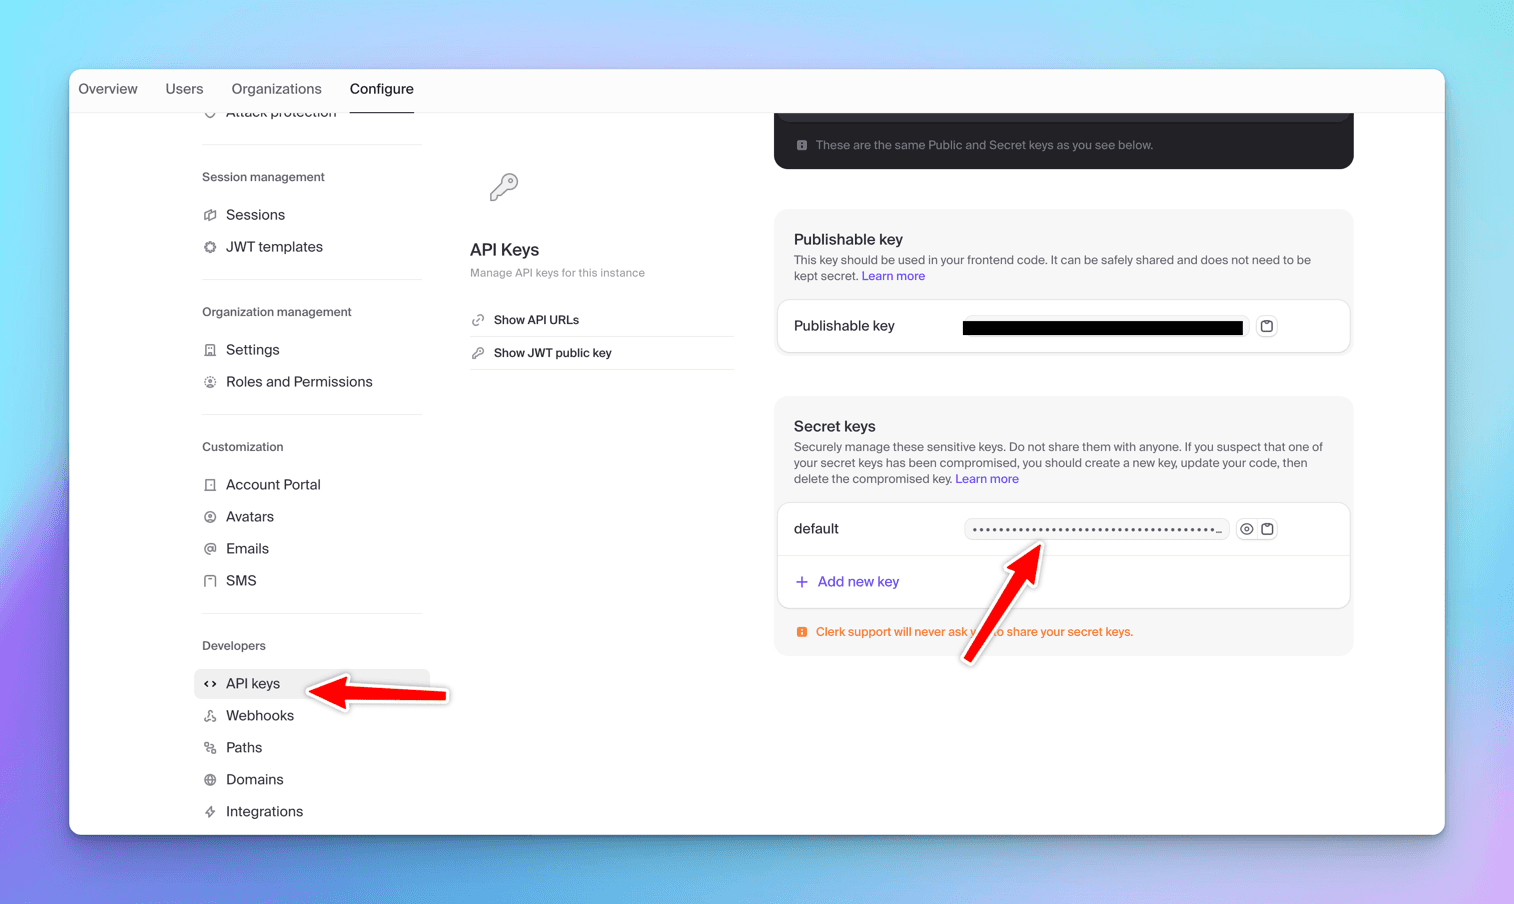
again a heads-up: this is a sensitive key, so keep it safe and don't share it or check it into source control.
"ClerkSettings": {
    "Authority": "https://humble-rhino-42.clerk.accounts.dev",
    "AZP": "http://localhost:5173",
    "SecretKey": "CLERK DASHBOARD SECRET KEY"
  }
Clerk Auth on .NET side is a bit different as compared to Supabase, it does not validate the audience or issuer, rather it validates and checks for the "azp" claim in the incoming token.
"azp" refers to Authorized Party, in our example we have set Authorized Party to "localhost:5173" which is the local home page of the Vite React app. Hence in the OnTokenValidated event, we are checking the "azp" claim in the incoming token.
Now that we have set up the auth on the backend, lets create a protected test endpoint.
 [Route("api/[controller]")]
    [ApiController]
    public class NamesController : ControllerBase
    {
        [Authorize]
        [HttpGet("test")]
        public IActionResult Test()
        {
            return Ok("This is the response from the sample protected endpoint");
        }
    }
We get a 401 Unauthorized while trying to browse this endpoint as it is, without a token.

Let's update our Clerk React app to extract the access token and call the protected API endpoint.
import React, { useState } from "react";
import axios from "axios";
import { useAuth } from "@clerk/clerk-react";


const Success = () => {
  const [data, setData] = useState("");
  const { getToken } = useAuth();


  async function callAPI() {
    const API_URL = "https://localhost:7110/api/Names/test";
    const token = await getToken();
    console.log("token", token);
    let config = {
      headers: {
        Authorization: "Bearer " + token,
      },
    };
    const response = await axios.get(API_URL, config);
    setData(response.data);
  }
  return (
    <>
      <h1>Success page</h1>
      <button onClick={callAPI}>Call API</button>
      <div>
        <p>{data}</p>
      </div>
    </>
  );
};


export default Success;
We use:
-
The useAuth hook from clerk-react that helps to grab the access token post successful login.
-
We have a Call API button which performs an axios GET request and appends the token in the Authorization header of the request.
-
We populate the div with the response of the API call.
Let's run both the React and .NET apps and see how they work together.

Click on the Call API button, the control goes to the .NET end, and we see the "azp" claim in the incoming token that is captured in the OnTokenValidated event.

Once the token validation is successful, we get a positive response on the UI. This means we've successfully authenticated with Clerk on both the frontend and backend, and the logged-in user can access the protected API.
Both Supabase and Clerk are really easy to integrate on the backend as well.
On OAuth Provider Integration - Github
In this section, we are going to integrate GitHub login in our apps and see how Supabase and Clerk works against each other.
Supabase
Click on Authentication -> Providers in Supabase Dashboard, and we will see an extensive list of various OAuth providers that Supabase supports.
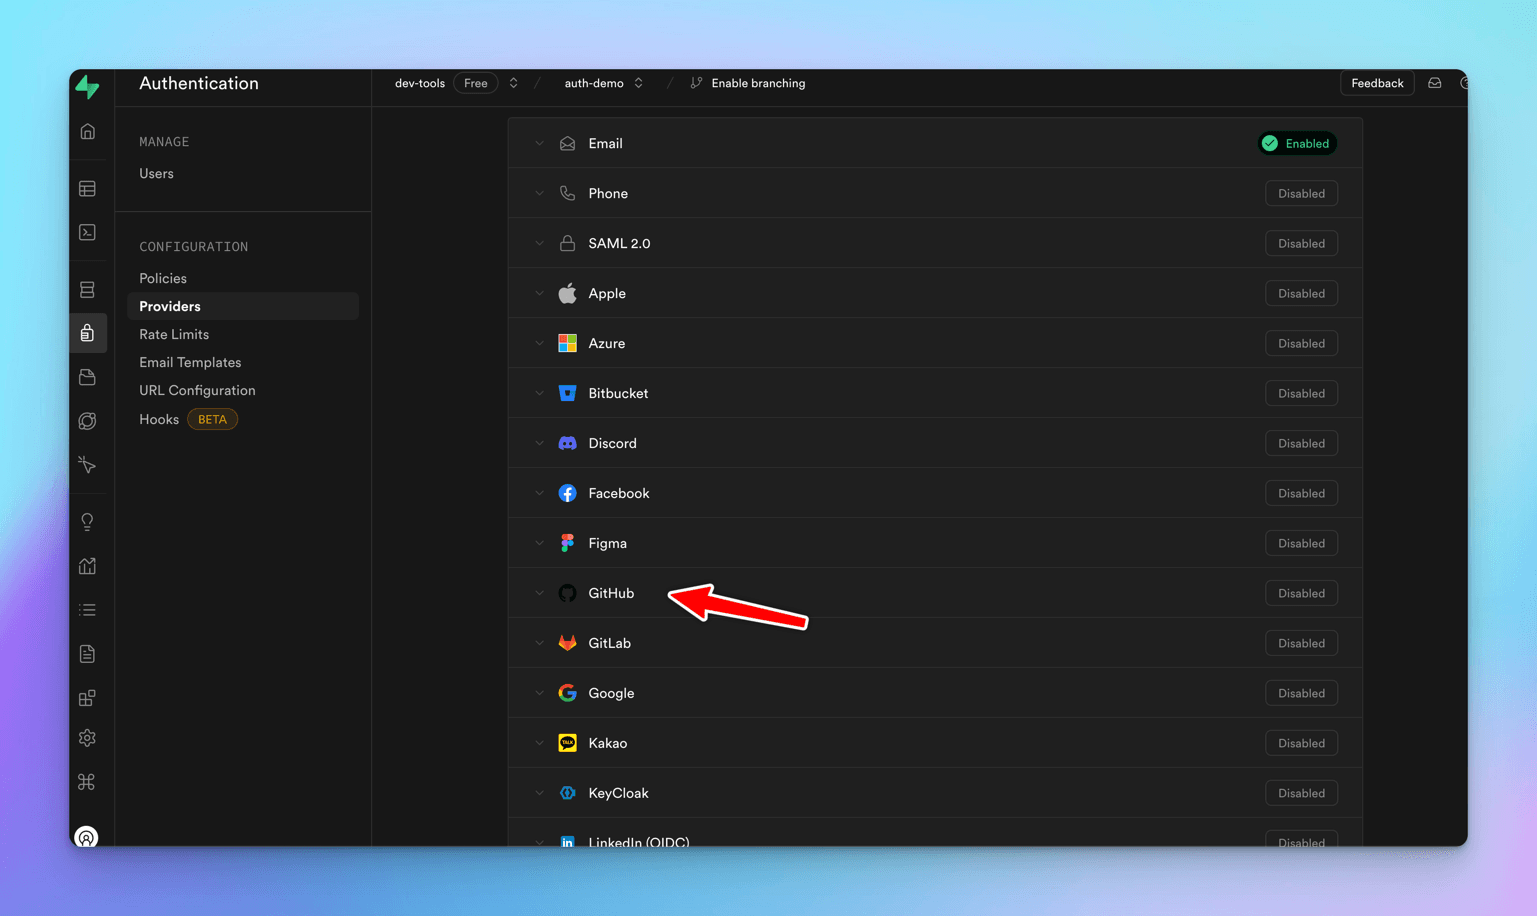
Let's click on GitHub and add the details. We see that the Callback URL is pre-populated while Client ID and Client Secret fields are empty. Where to get these details from?
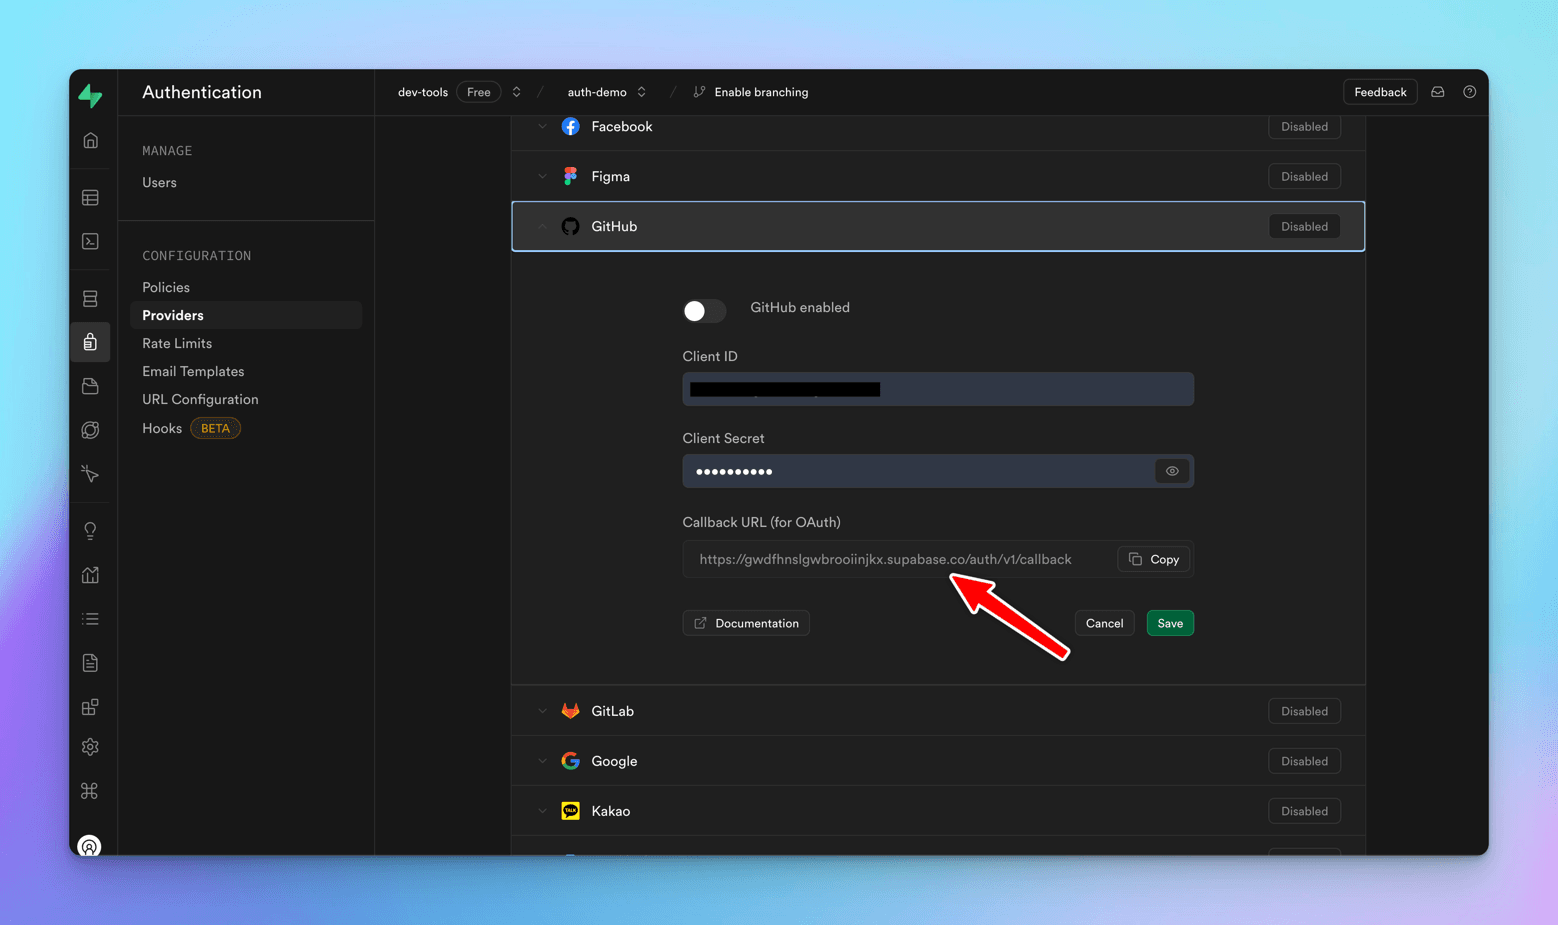
We need to create an OAuth app on GitHub end, and then we will get the Client ID/Secret that we can populate at Supabase's end.
Let's go to GitHub -> Login -> Settings -> Developer Settings -> OAuth Apps -> New OAuth App
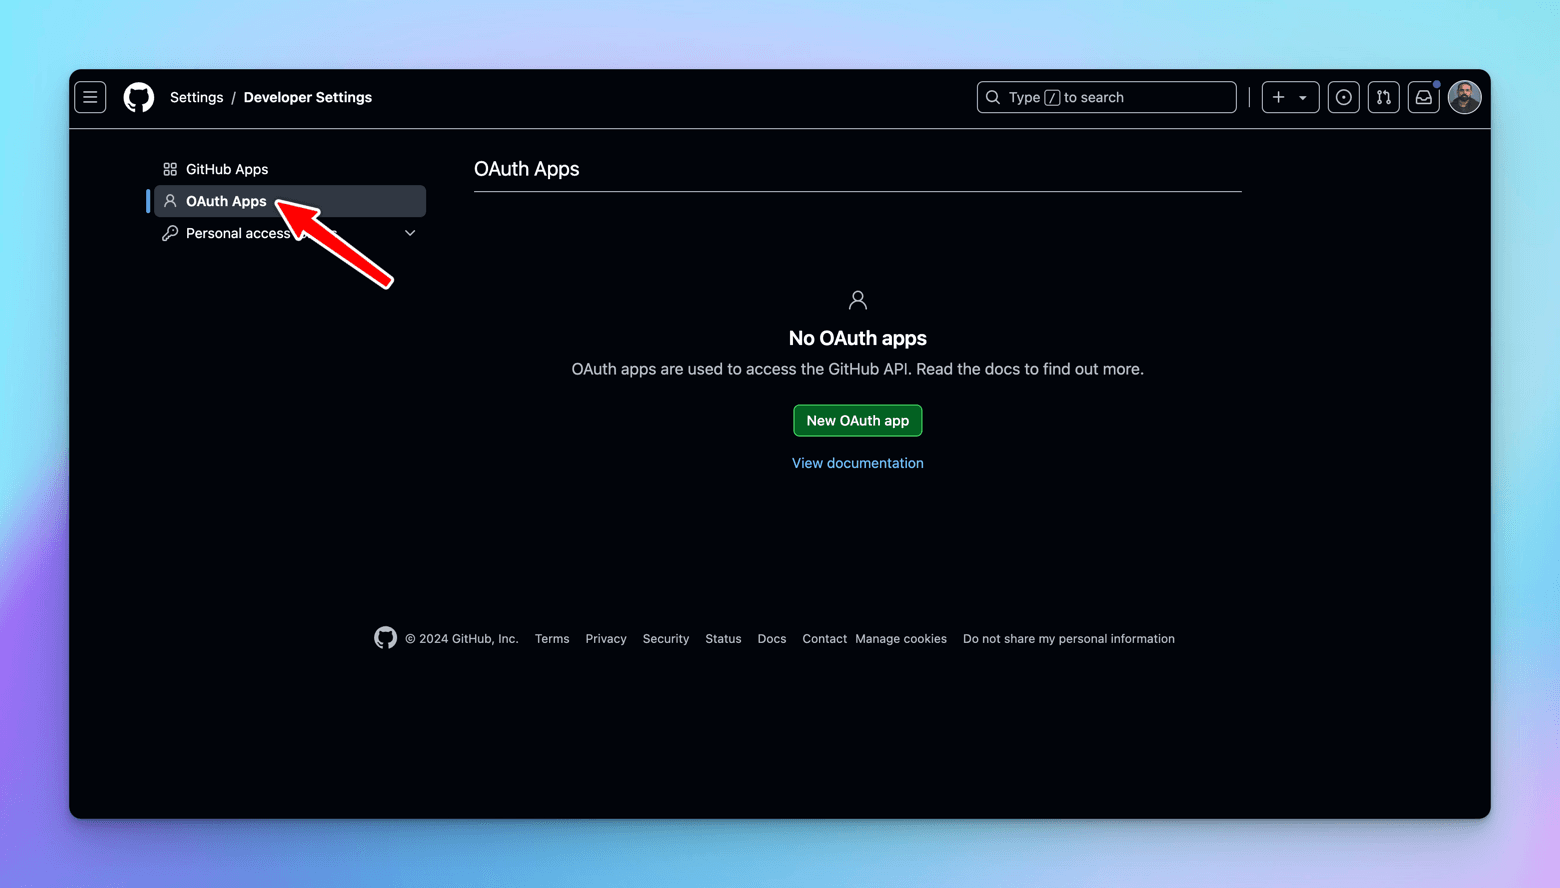
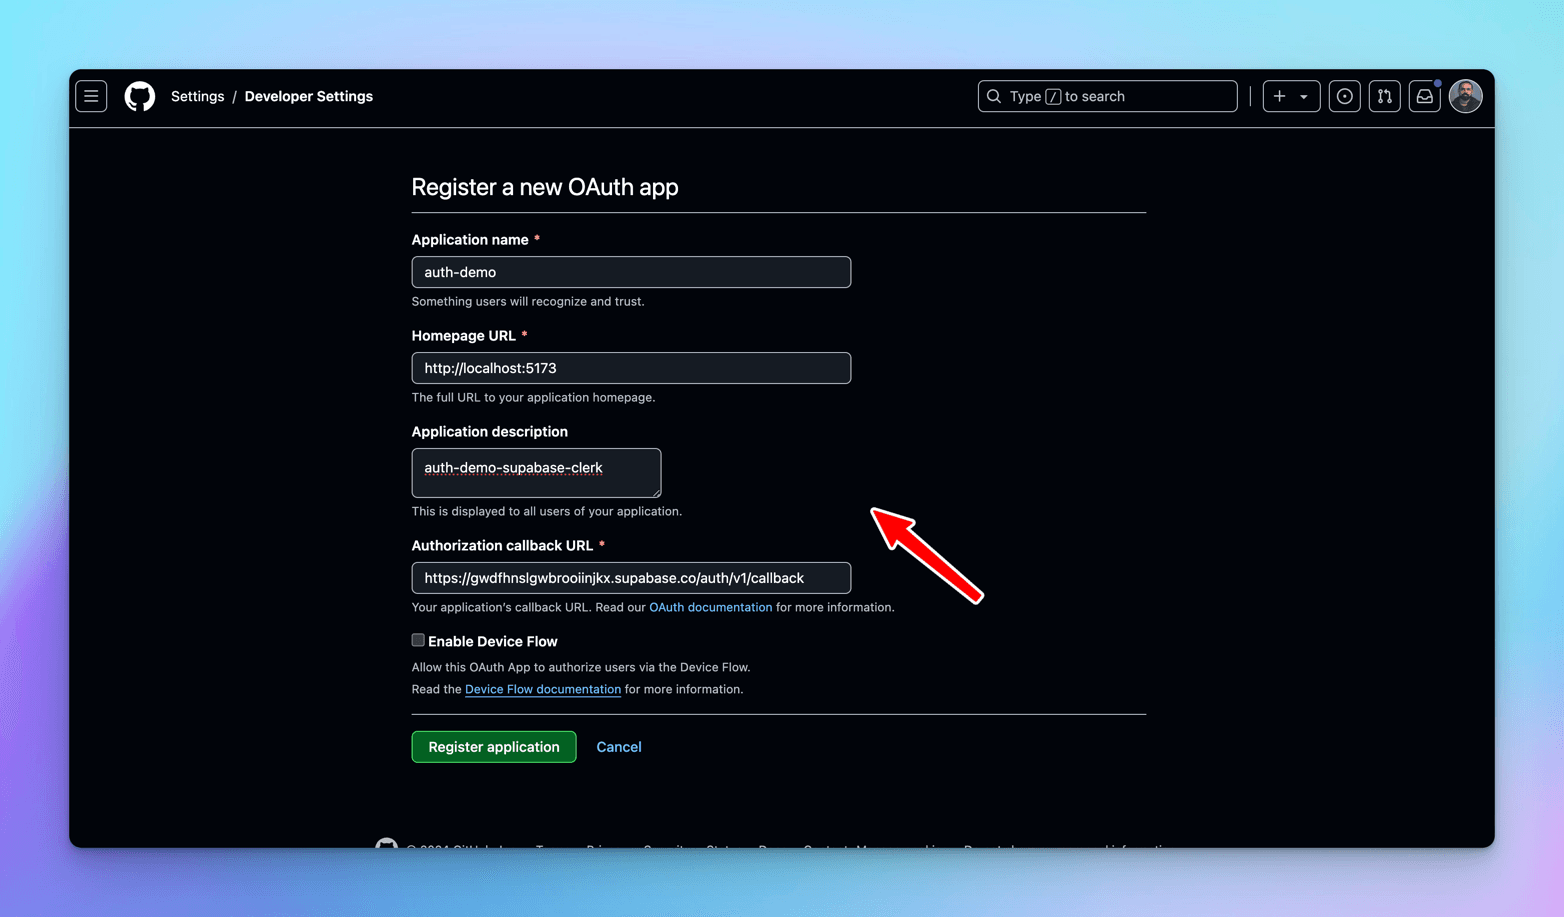
Register a new OAuth app.
-
Application Name - provide a meaningful name
-
Homepage URL - React app's local home page url - localhost:5173
-
Application Description - provide some meaningful description
-
Authorization Callback URL - the call back URL where in the auth will fall to after successful operation, Supabase provides it, copy and paste it over here
After successfully registering the app, generate a client secret and copy both the Client ID and Client Secret over to Supabase.
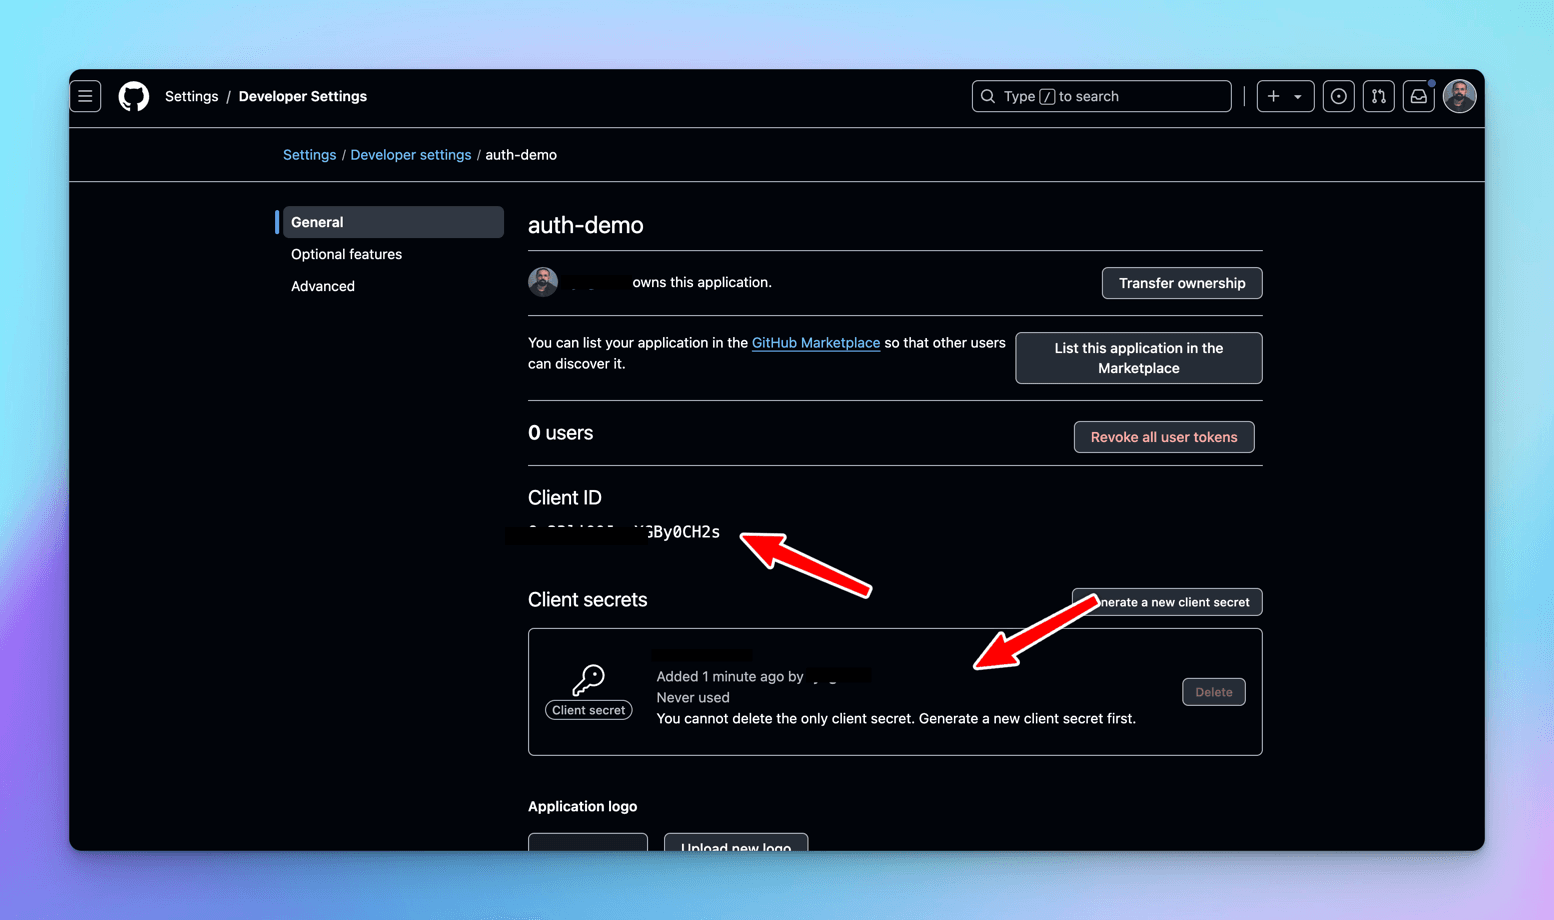
Let's go to our Supabase React app and add Github as a provider, so that it appears as a login mechanism.
In the Login screen -> <Auth /> component, add the providers prop and mention "github" over there. Providers is an array that can include all the OAuth providers that have been setup.
 return (
    <>
      <div className="container">
        <h1 className="center">Login</h1>
        <Auth
          supabaseClient={supabase}
          appearance={{ theme: ThemeSupa }}
          providers={["github"]}
          theme="dark"
        />
      </div>
    </>
  );
};

This is the only configuration that is required at the code end, let's run the app and observe.
We see a Sign in with GitHub link on the React Login page, let's click on it.
We see the GitHub OAuth Authorize screen, click on the Authorize button.
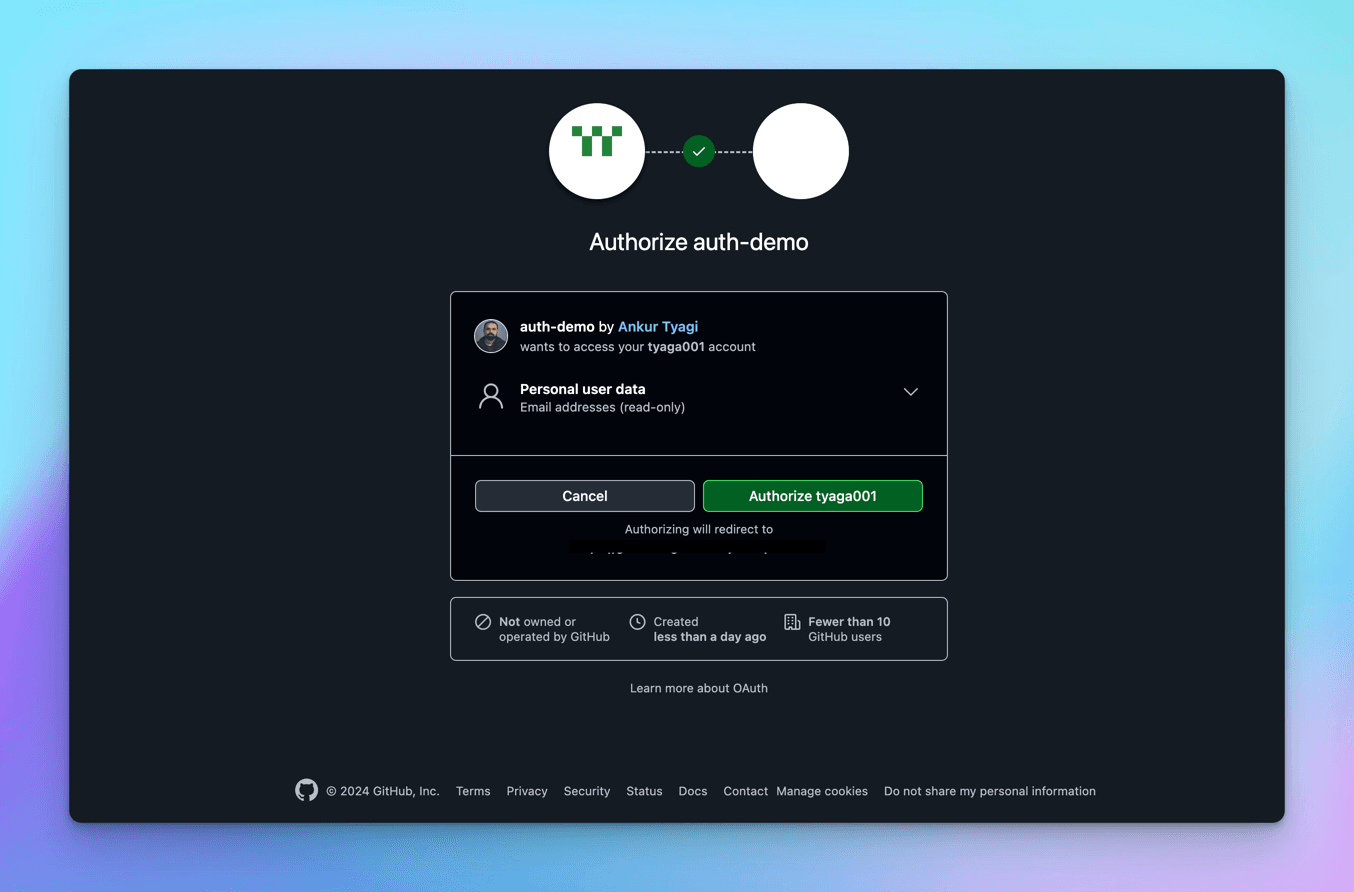
We are redirected back to localhost:5173 because it is what we have configured in github, and we see the token in the local storage of the browser, with the provider as github.
Clerk
Let's integrate GitHub OAuth provider in Clerk.
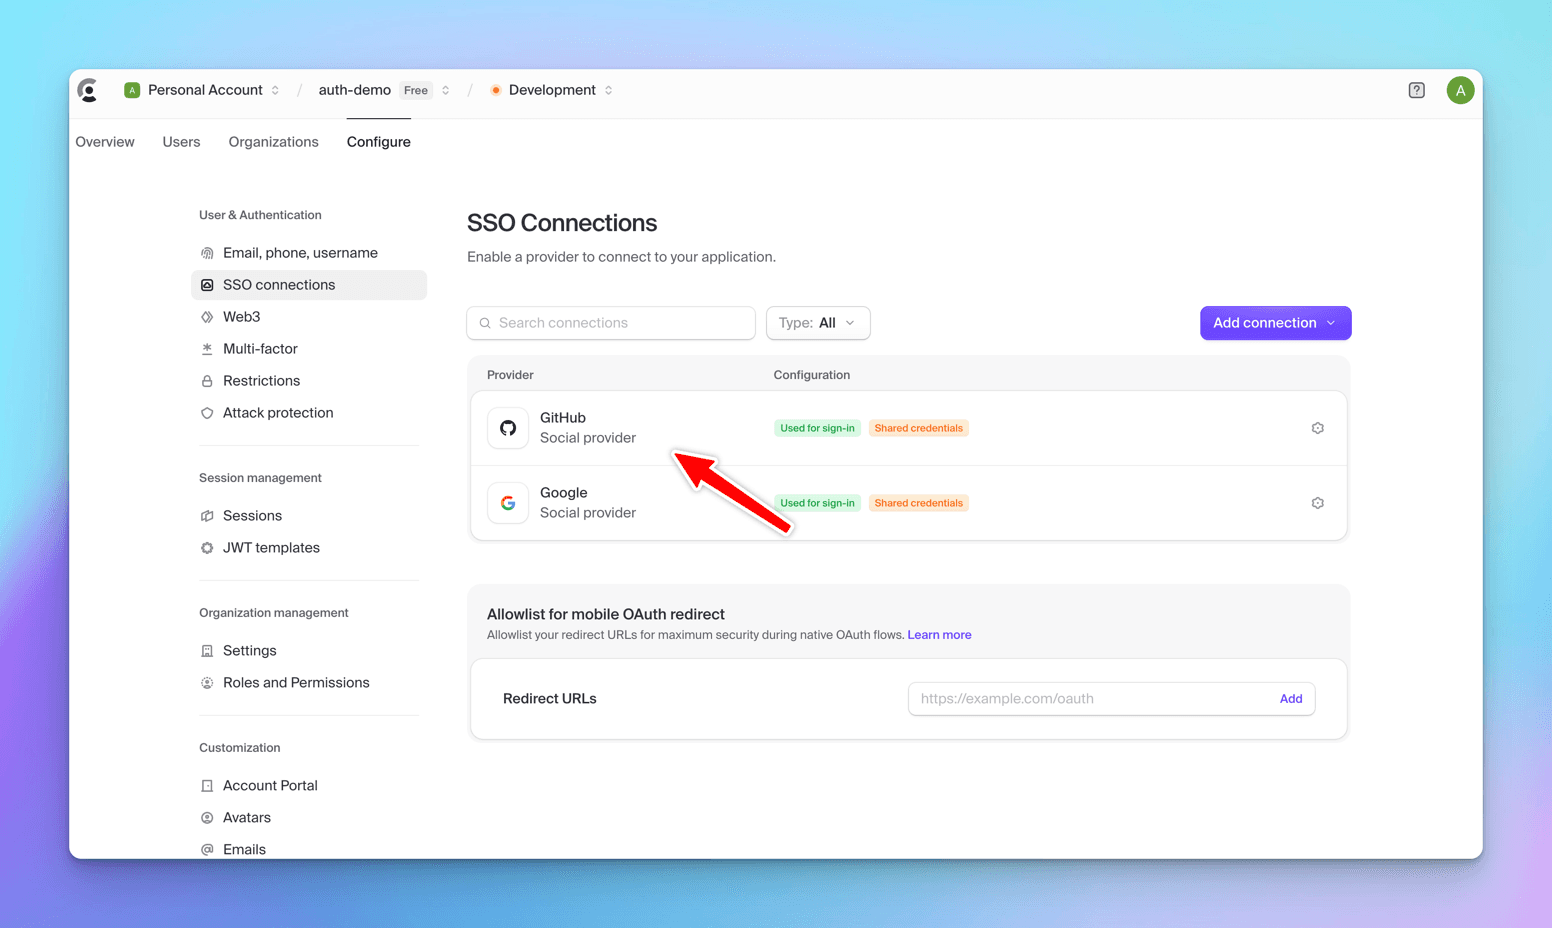
Go to Clerk Dashboard -> Configure -> SSO Connections -> Add Connection -> Choose Github from the dropdown.
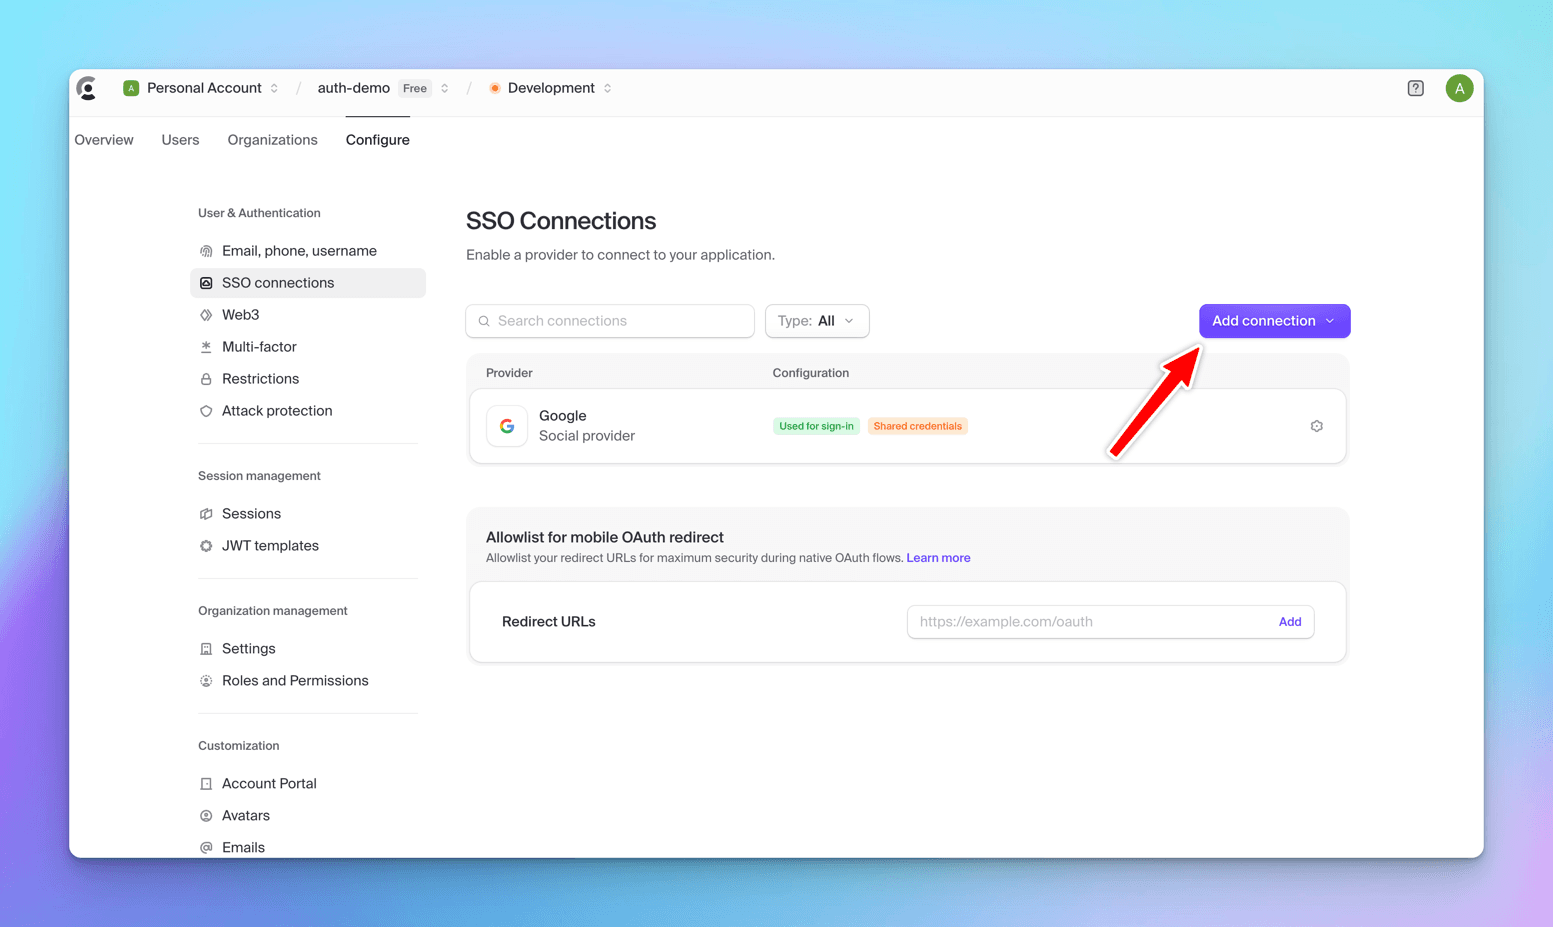
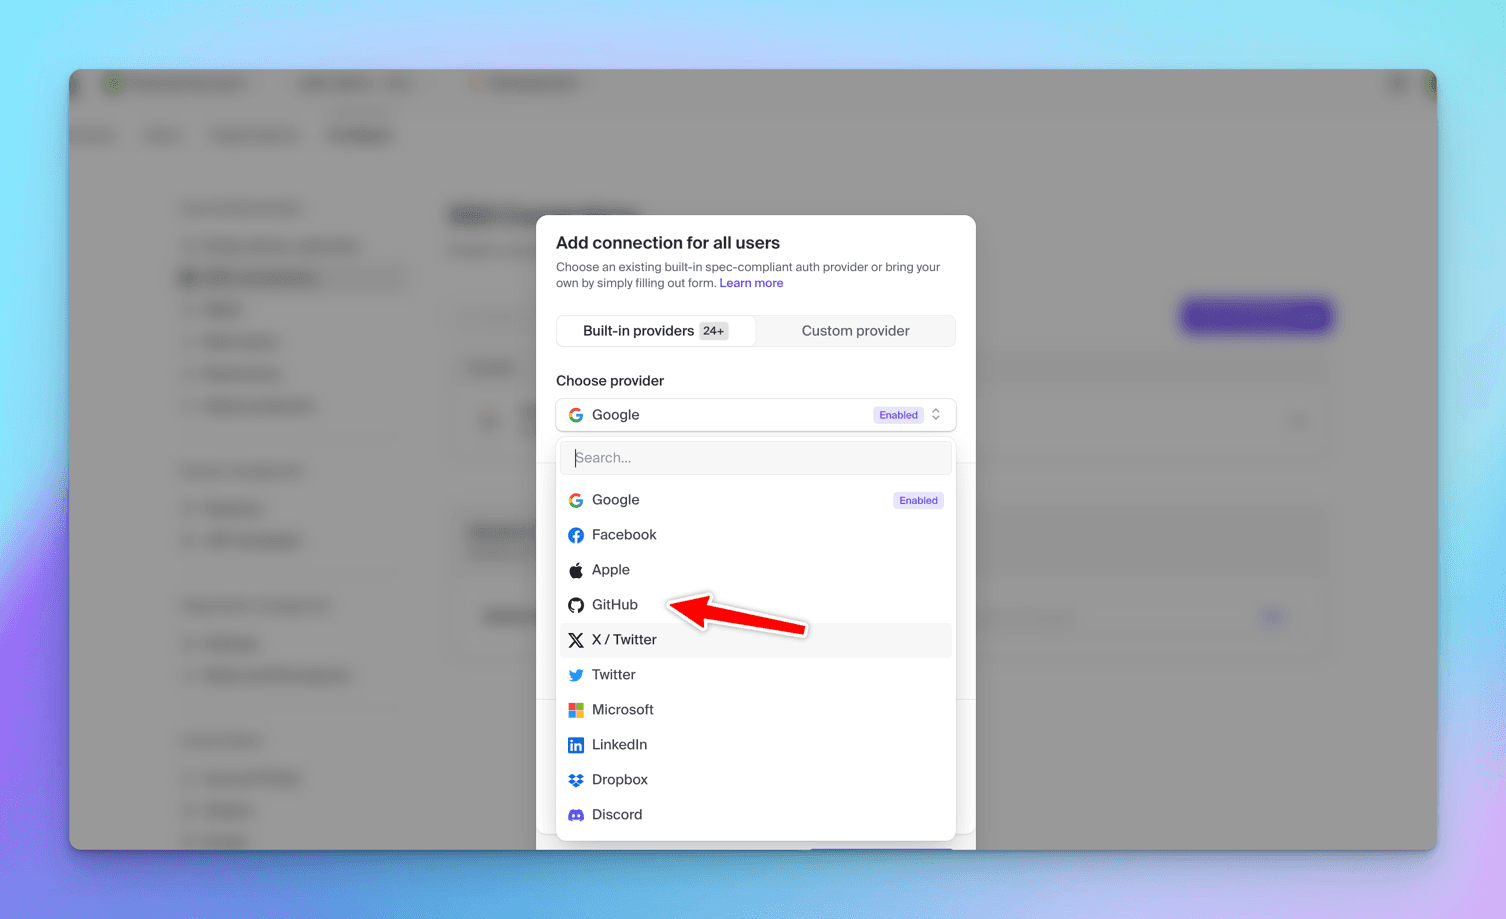
GitHub will be added as an ´OAuth` provider.
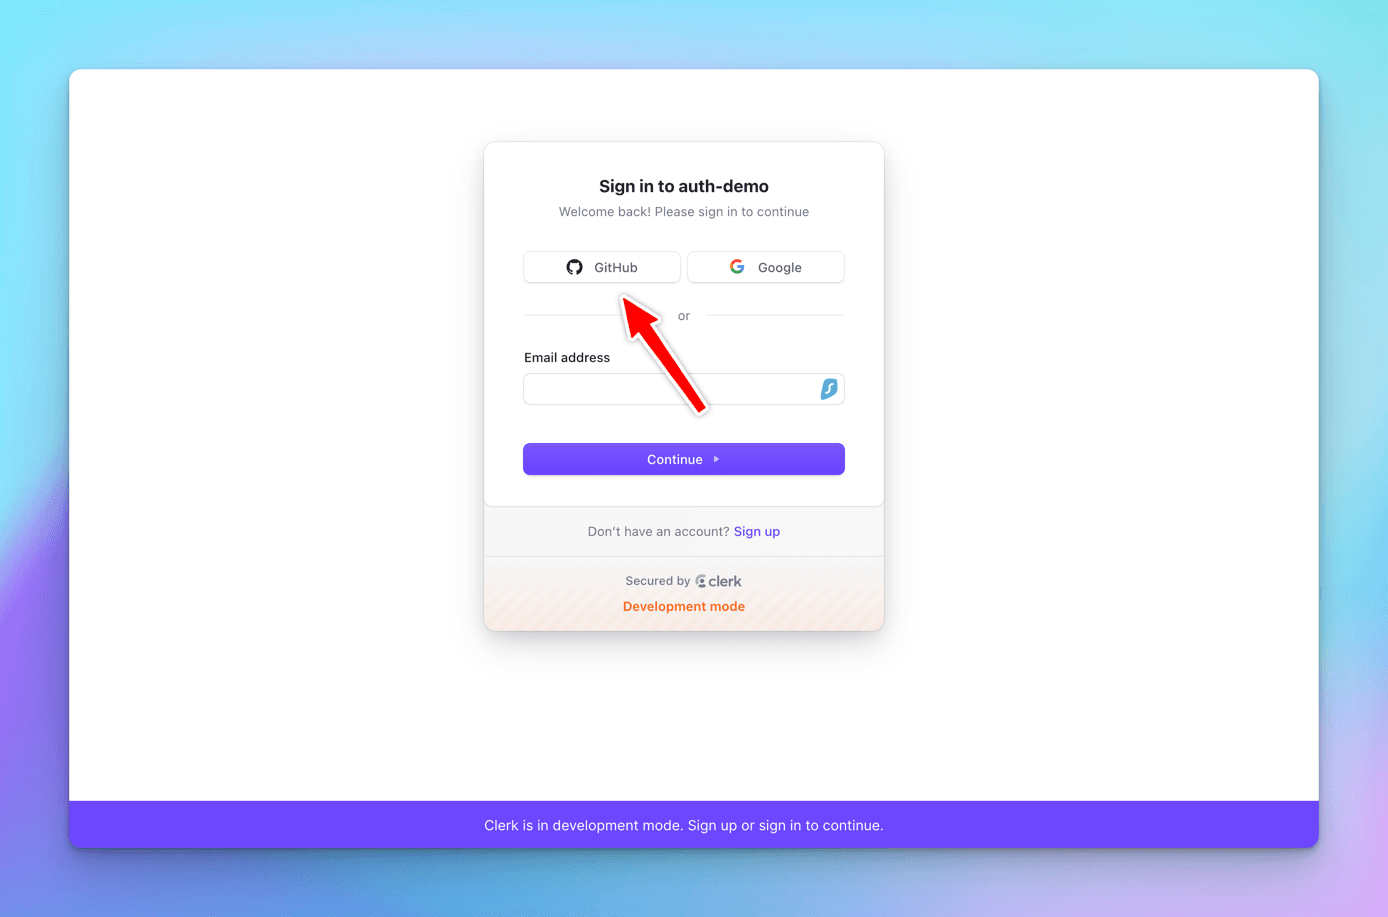
Let's run the React app and click the Signin button, we will see GitHub also as a login provider.
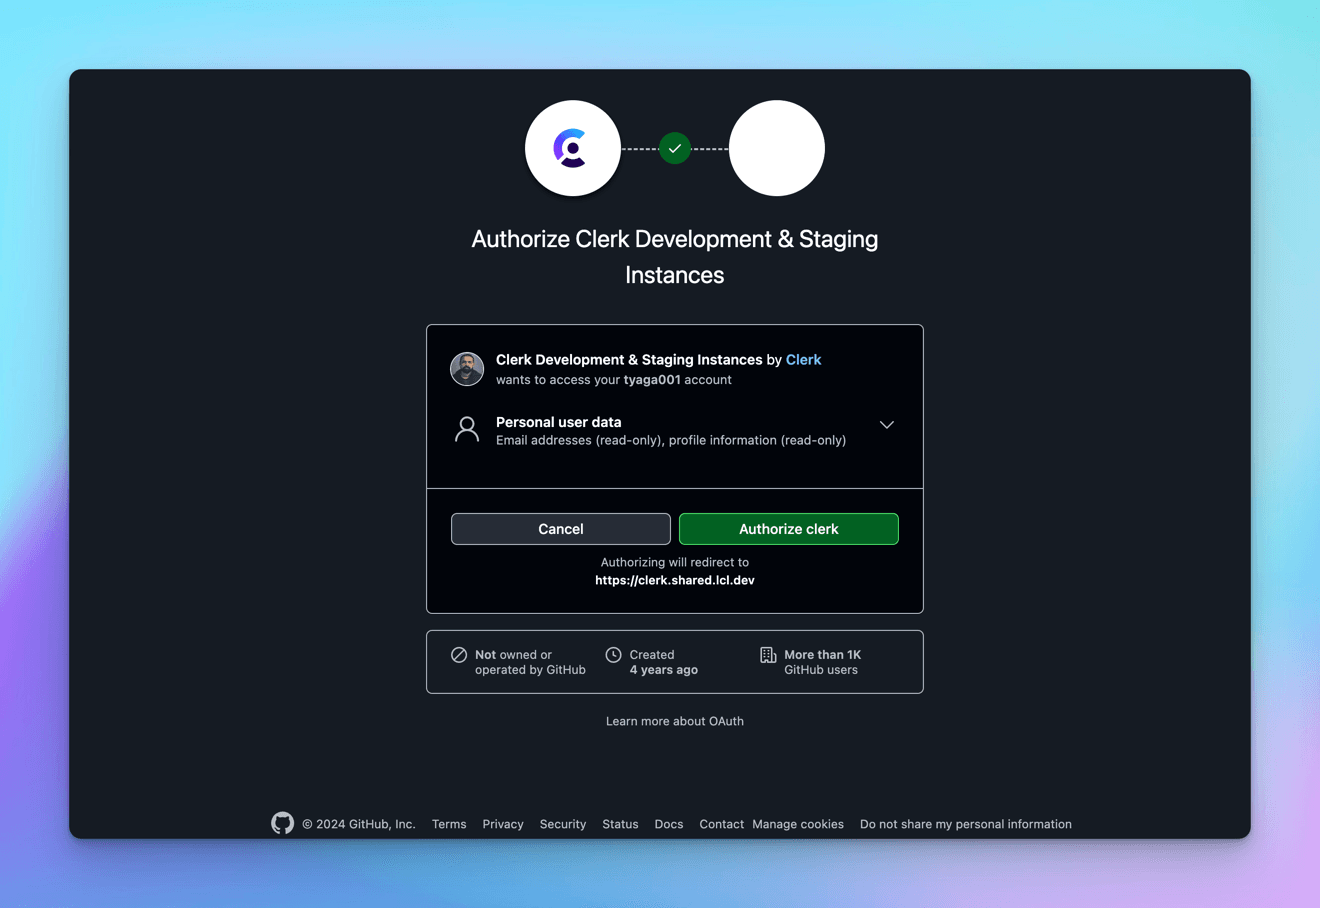
Click on GitHub link, and it will ask to authorize Clerk with the logged in GitHub user id.
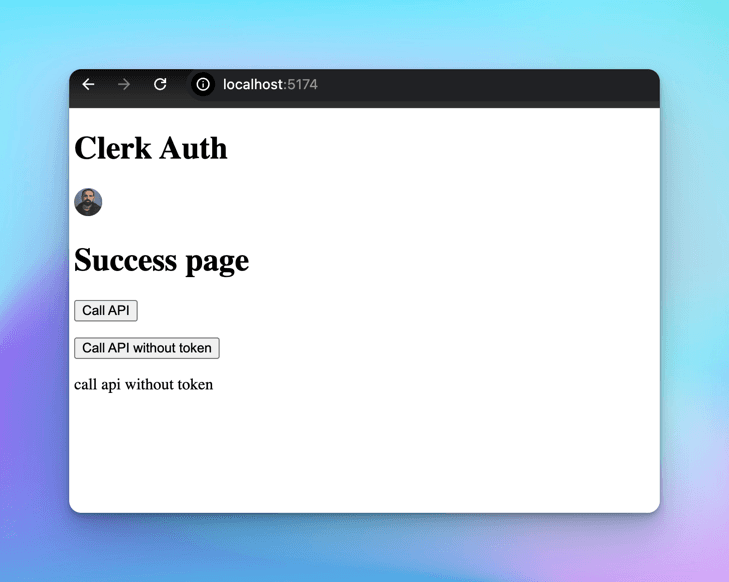
Upon authorizing it, we will be redirected back to the Success page with the UserButton component populated.
This is the trivial way, the limitation of it is that every time we will be asked to authorize Clerk via github, to encounter this, we can click on Use Custom Credential option in Github in SSO Connections page.
let's create a separate OAuth app on Github, then enter the Client ID/Secret at Clerk's end, the same way we did for Supbase.
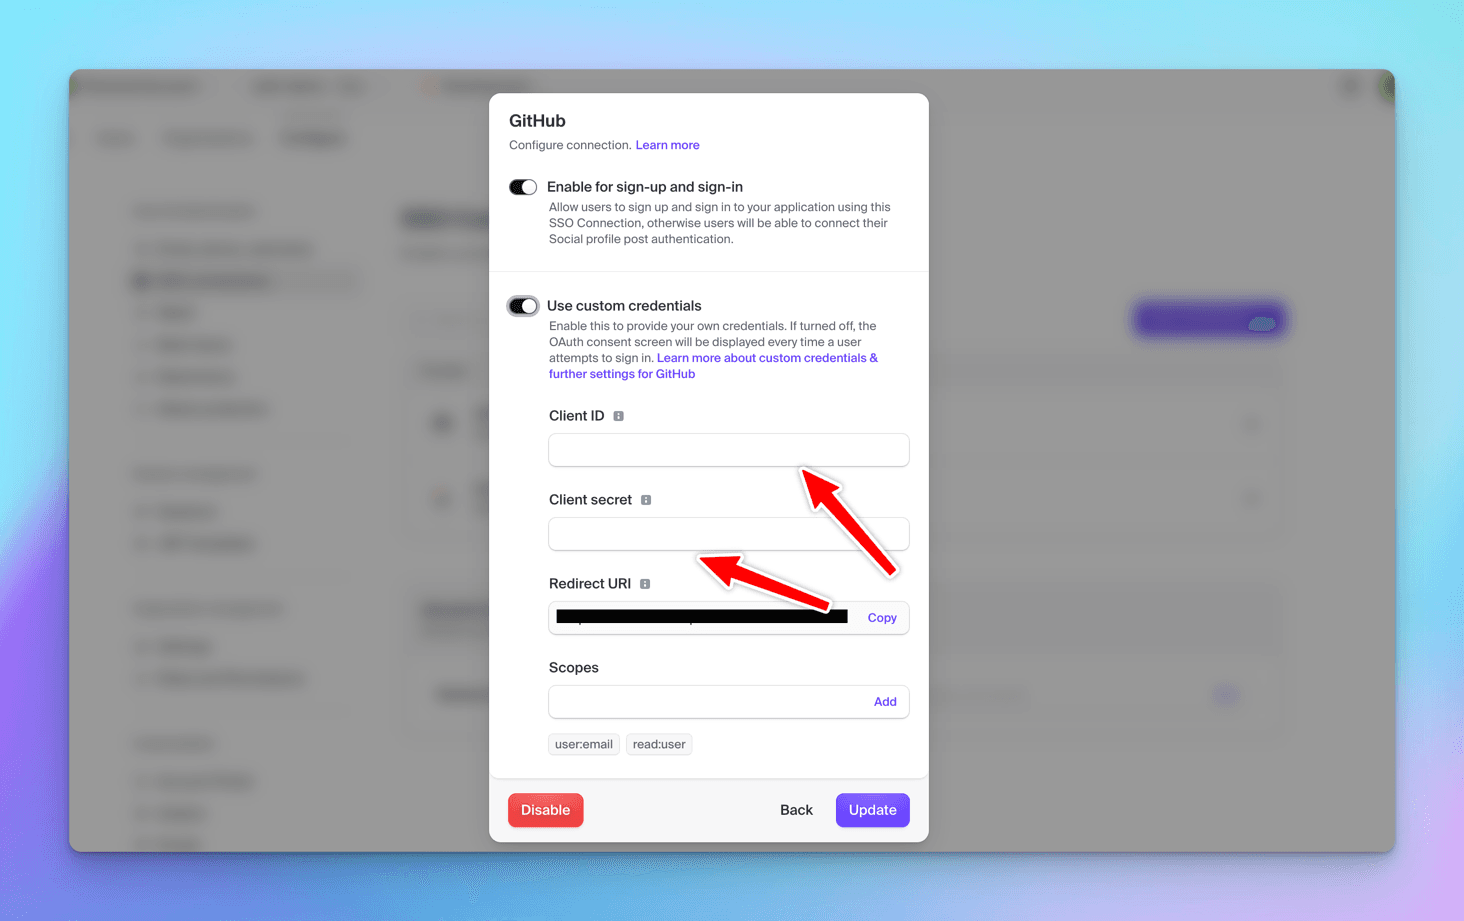
Create a new OAuth app on GitHub, and copy the Client ID/Secret at Clerk's end.
Upon click of the GitHub button on the Login Screen, the user will be prompted to the below Authorize screen and the login will be successful.
Let me recap and summarize all the key features I've covered.
Who wins between Supabase vs Clerk
Overview
Supabase
Open-source Firebase alternative providing backend services, including authentication, real-time database, and storage.
Clerk
A full-featured authentication solution focused on seamless integration and user management, primarily for front-end applications.
OAuth Support
Supabase
Supports OAuth providers like Google, GitHub, GitLab, Twitter, etc.
Clerk
Native OAuth integrations with popular providers like GitHub, Google, Facebook, and more.
Multi-Factor Authentication
Supabase
Native support for MFA via authenticator apps (TOTP) and phone verification. Includes enrollment, challenge/verify APIs, and configurable security policies. Learn more here
Clerk
Built-in multi-factor authentication (MFA) with multiple verification methods.
Session Management
Supabase
Provides JWT-based session management. Supports server-side token refresh.
Clerk
Manages sessions via Clerk's SDK, with server and client-side control over session duration and renewal.
Frontend Integration
Supabase
Can be integrated with custom UI via SDKs (JavaScript, React, etc.).
Clerk
Pre-built components for React, Next.js, and other frontend frameworks for a seamless user experience.
Backend Integration
Supabase
Typically paired with Supabase's PostgreSQL database. JWT tokens can be validated for API requests.
Clerk
Easy API access and integration with Clerk-managed sessions for backend validation and role-based access.
Pricing
Supabase
Free tier with limits on users and authentication events, paid plans for higher usage.
Clerk
Free tier available with pricing based on active users; advanced features require paid plans.
Customization
Supabase
Customizable authentication flow, but requires more setup effort for fully custom UI.
Clerk
High-level of customization with pre-built or custom authentication components.
Ease of Use
Supabase
Requires more setup for a full authentication solution, but more flexible as part of a larger BaaS.
Clerk
Highly user-friendly and developer-friendly with minimal configuration needed for basic authentication.
Documentation
Supabase
Extensive documentation, but the learning curve can be steeper due to the wide range of features. checkout Supabase docs here
Clerk
Clear and well-documented with examples, focused on authentication needs. checkout Clerk docs here
Conclusion
I've taken an in-depth look at both Supabase and Clerk authentications in this article.
Just to clarify, this is not a sponsored post, and as promised, no posts on this blog, DevTools Academy, will ever be sponsored. I want to share completely unbiased views on amazing developer tools. If you spot any mistakes or if you love what you read, I'd really appreciate your feedback. Feel free to share any questions you have so I can consider adding them to the blog.
-
Supabase: More focused on being a full backend as a service with authentication as part of its suite of tools. Ideal if we're looking for an open-source Firebase alternative with additional features like databases, storage, and server-side functions.
-
Clerk: Specializes in user auth and management, offering pre-built components and a front-end-centric approach. It provides a higher level of abstraction for authentication with minimal configuration required, particularly useful for complex user management scenarios.
Wrapping Up
Congratulations. 🎉 You've completed the project for this comparison tutorial.
You can find the full code for the app we built in this repository: Supabase Clerk Auth Demo.
Happy coding, and feel free to explore more with Supabase and Clerk.
Did you enjoy reading this article and have you learned something new? please share it on social media, reddit or in your discord communities.
See you soon in my next article. In the meantime, take care of yourself and keep learning. If you have any topic suggestions, feel free to raise an issue on GitHub.